
Welcome to the fifth (and last) in our new blog series on Kubernetes! In this series, we explore the world of Kubernetes deployment on Zadara, and how it can be used to manage containerized applications in our AWS-compatible cloud. Whether you’re new to Kubernetes or an experienced user, this series will provide you with valuable insights and best practices for managing your containerized applications in the Zadara cloud. Stay tuned for more exciting content!
This blog post will focus on the customization side of our EKS-D solution, addressing various customer needs when creating production-grade Kubernetes clusters.
Custom configuration
Up until now we just deployed Kubernetes as-is, by using all the default values embedded within our automated deployment workflow. Such a configuration might be suitable for a quick demo or a PoC-level environment, but certainly not for a production-grade setup. The most obvious example is the control-plane setup (defaulting to a single-node rather than a highly available 3-node configuration), but further customization may be required as well.
As a first step toward customizing our EKS-D solution would be to understand what’s going on when we run the all-in-one wrapper script (apply-all.sh) that deploys our cluster:
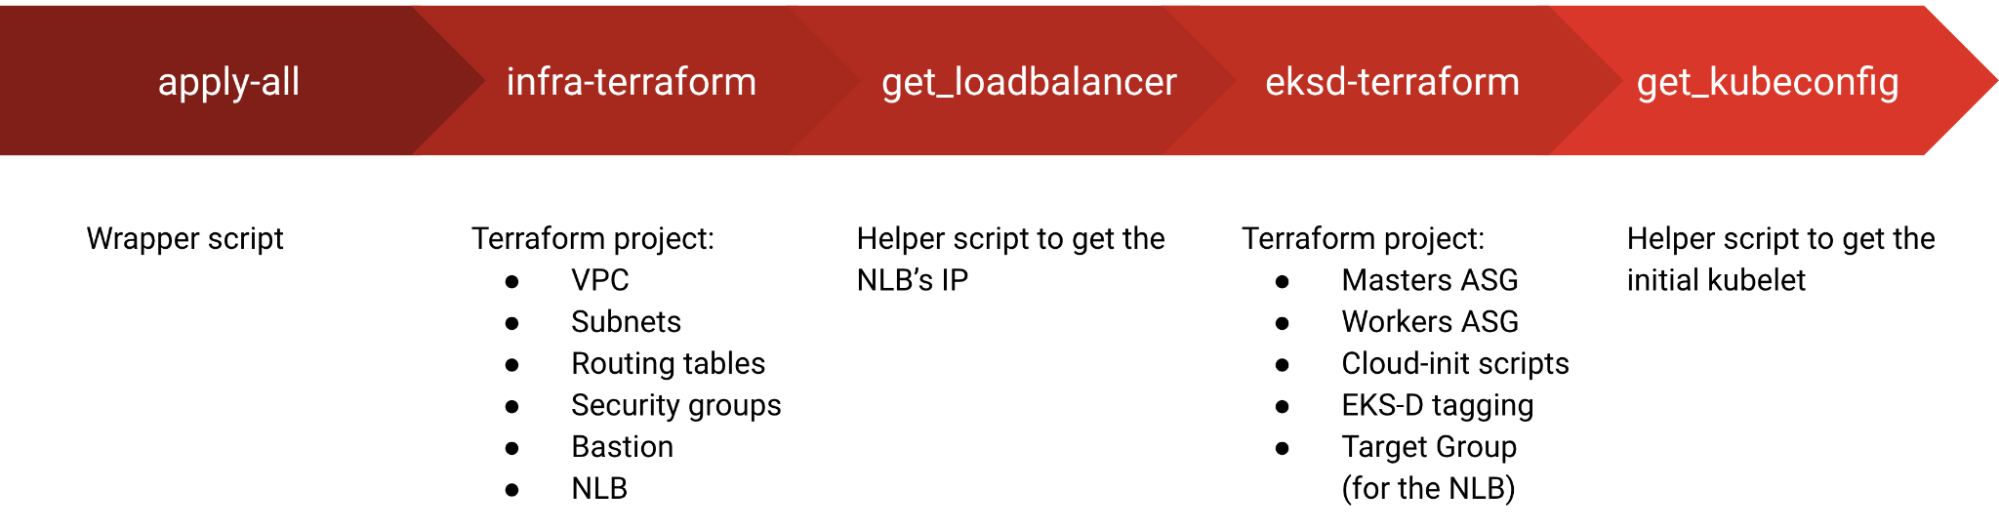
While this wrapper script utilizes only a few basic variables to facilitate the workflow execution, the two internal Terraform projects (responsible for the required infrastructure and the EKS-D deployment) support numerous variables for various use-cases and configurations.
You can find the complete list of variables within the two projects’ variable files (infra & eksd), for now, let’s explore some of the interesting ones:
expose_k8s_api_publiclyin infra-terraform – to control whether the API Server’s NLB will be public-facing or not (default is true)vpc_cidrin infra-terraform – to control the VPC’s CIDR (default is 192.168.0.0/16)masters_countin eksd-terraform – to control the amount of initial control-plane nodes (default is 1, set to 3 for a highly available control-plane)workers_additionin eksd-terraform – to control the amount of additional data-plane nodes on top of the initial ones (as a max-size ASG argument, default is 3)ebs_csi_volume_typein eksd-terraform – to specify the VolumeType to be used by the EBS CSI (default is gp2)workers_instance_typein eksd-terraform – to specify the data-plane instance-type (default is z8.large)
Changing the default value of any variable requires either changing them inside the relevant project’s variables.tf file, or setting them as terraform-based environment variables prior to the execution, for example:
$ TF_VAR_masters_count=3 ./apply-all.sh
While using environment variables is an easy way to affect the deployment without editing files, please keep in mind that if you do not persist your changed value inside the project, re-running the deployment without the environment variable will override your original value and may have a negative effect on the deployment – so editing the variable files is usually preferred.
Another use-case of customized variables is the ability to control the deployment’s optional add-ons as part of these eksd-terraform variables:
install_ebs_csi– whether or not to install the AWS EBS CSI driver (default is true)install_lb_controller– whether or not to install the AWS Load Balancer Controller (default is true)install_autoscaler– whether or not to install the Cluster Autoscaler (default is true)install_kasten_k10– whether or not to install Kasten K10 (default is false)
Unlike the optional add-ons, the EKS-D deployment will also install some mandatory ones implicitly – like the CCM (Cloud Controller Manager) component which is the AWS Cloud Provider for Kubernetes, the CoreDNS and kube-proxy which are considered essentials and bundled within EKS-D. Please note that while you may control some of these add-ons by modifying the EKS-D image (more on that later on), others may require deep-level changes to some of the cloud-init scripts.
One last add-on which is not optional but manageable through Terraform is the CNI (Container Network Interface). This is a core component of Kubernetes that handles the entire networking stack, so the cluster will not initialize without it – but you may decide which CNI implementation to use with your EKS-D cluster out of the supported ones listed below, using the cni_provider variable:
- flannel – this is the default CNI, fast simple and reliable layer-3 implementation
- calico – this is an advanced multi-layer CNI which adds routing & security features
- cilium (experimental support) – this is another advanced multi-layer CNI which is eBPF-native and adds advanced routing, security & observability features
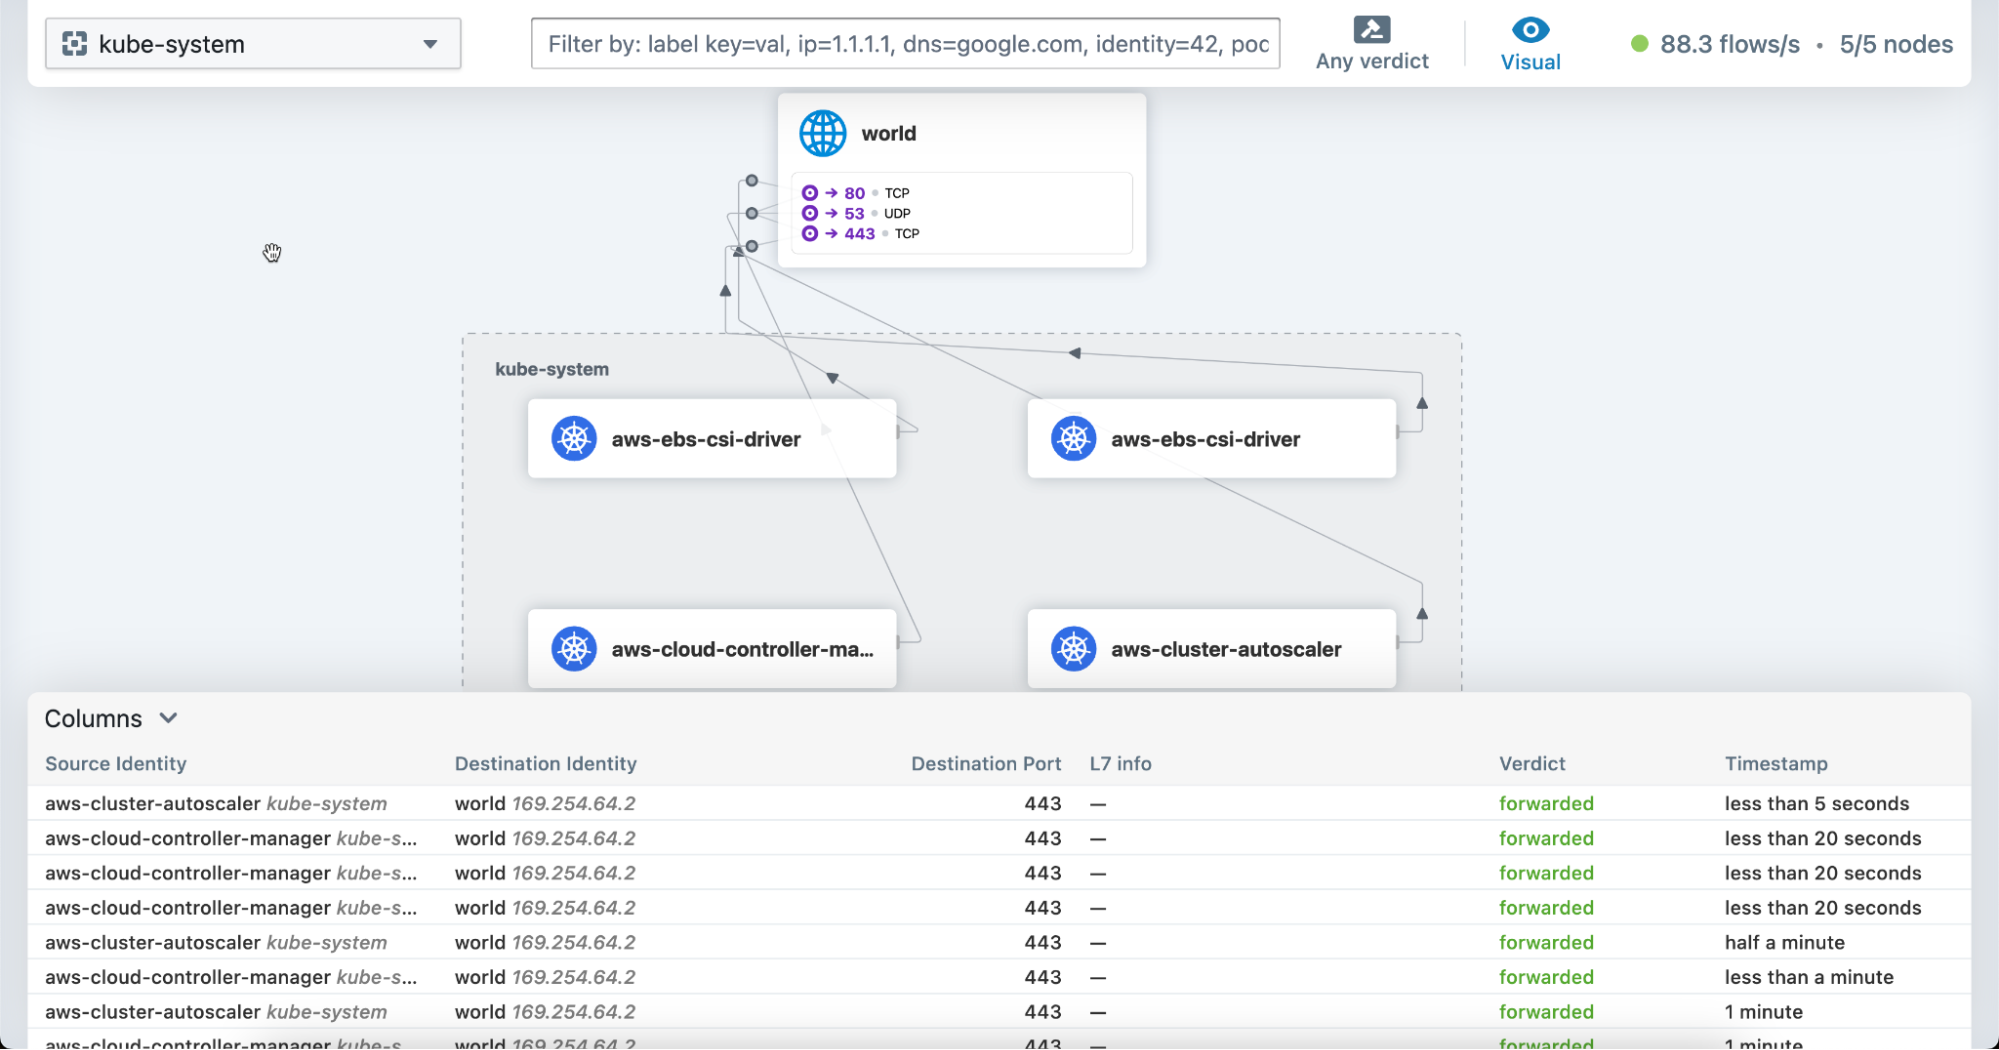
Regarding Cilium, while considered experimental (as Zadara only validates the essential networking functionality as part of our testing procedures) the deployment will also enable the Hubble UI observability feature and you may access it via the cilium CLI by referencing its namespace:
$ cilium hubble ui --namespace cilium-system
Running this command will port-forward the hubble-ui service into our localhost, so we can monitor our cluster’s networking traces:
Please note that opting to deploy EKS-D with non-default CNI may require additional resources and downloading as part of the initialization phase, so keep that in mind when considering sizing, etc.
Finally, regarding the external ETCD backup option we discussed on the previous blog post – please consider using the below variables to export the control-plane’s local backup to an external Object Storage solution:
backup_access_key_id& backup_secret_access_key – Object Storage credentialsbackup_region– Object Storage region (default is us-east-1)backup_endpoint– Object Storage full URL (not required for AWS S3)backup_bucket– Object Storage container/bucket namebackup_rotation– maximal number of backup files to retain on the Object Storage (default is 100)
Custom workflow
In some cases, users may wish to run the workflow by themselves rather than using the wrapper script, or they may need to modify the deployment projects in various ways. In such a case, the workflow can be broken down into the below two main phases.
The first phase would be the infrastructure deployment, which handles some prerequisites to the EKS-D deployment (for example, the VPC & subnets in which the Kubernetes cluster will be created). You can run the infra-terraform project (or a variation of it) by following the documentation steps, but note that after the second Terraform execution you will still be required to get the NLB IPs, either manually (for example via the zCompute console) or by running the get_loadbalancer.sh script with the parameters mentioned within the Terraform outputs:

Alternatively to using the infra-terraform project, meaning in case you would like to use your own infrastructure topology (either manually, via zCompute’s VPC Wizard, or via another cloud automation facility), please note the below requirements:
- Any private & public subnet must be tagged according to the AWS documentation for the AWS CCM/LBC to be able and discover them (note the tags are different for private vs. public subnets)
- You may use either a public-facing or internal NLB for the EKS-D api-server’s endpoint or skip it completely in case you don’t which to have a Load Balancer, but you will need to provide at least the private IP (and potentially also the public IP) of the Load Balancer or of your master instance to the EKS-D deployment phase
The second phase would be the EKS-D deployment, which handles running both the control-plane and the data-plane nodes, including linking the control-plane VMs to the EKS-D api-server’s NLB. You can run the eksd-terraform project (or a variation of it) by following the documentation steps, but note that after the Terraform execution, you will still be required to get the initial kubeconfig file from one of the master nodes, either manually or by running the get_kubeconfig.sh script with the parameters mentioned within the Terraform outputs:

If you wish to get the kubeconfig file manually rather than use the script, please note that under the regular infrastructure topology, you would need to go through the bastion VM to reach the control-plane VMs. Inside each master VM you will see the relevant file as /etc/kubernetes/zadara/kubeconfig (note that for Kubernetes 1.29 and above the user would be super-admin rather than the regular admin user).
Alternatively to using the eksd-terraform project, meaning in case you would like to deploy the EKS-D cluster yourself (either manually or via some other cloud automation facility), please note the below requirements:
- Any VM must be tagged with kubernetes.io/cluster/<kubernetes-name> key and owned value in order for the CCM to track its status
- As a reference example for a manual deployment you may refer to these manual deployment instructions, and further required add-on customizations as listed here
Custom image
While Zadara provides several pre-baked images of EKS-D in the cloud’s Marketplace, users may wish to use their own customized image for various reasons – maybe they would like to use a specific EKS-D version which Zadara does not provide (for example, version 1.27), modify some add-ons (for example not using the latest version of everything), harden the base OS image for increased security, etc.
The BYOI (Bring Your Own Image) methodology allows such customization by following the EKS-D Packer project guidelines, baking the image into a new AMI and afterwards pointing the EKS-D deployment to that customized AMI. In fact, Zadara uses the same Packer project to bake our own EKS-D images for the Marketplace, so it is always up to date. The project includes the following phases:
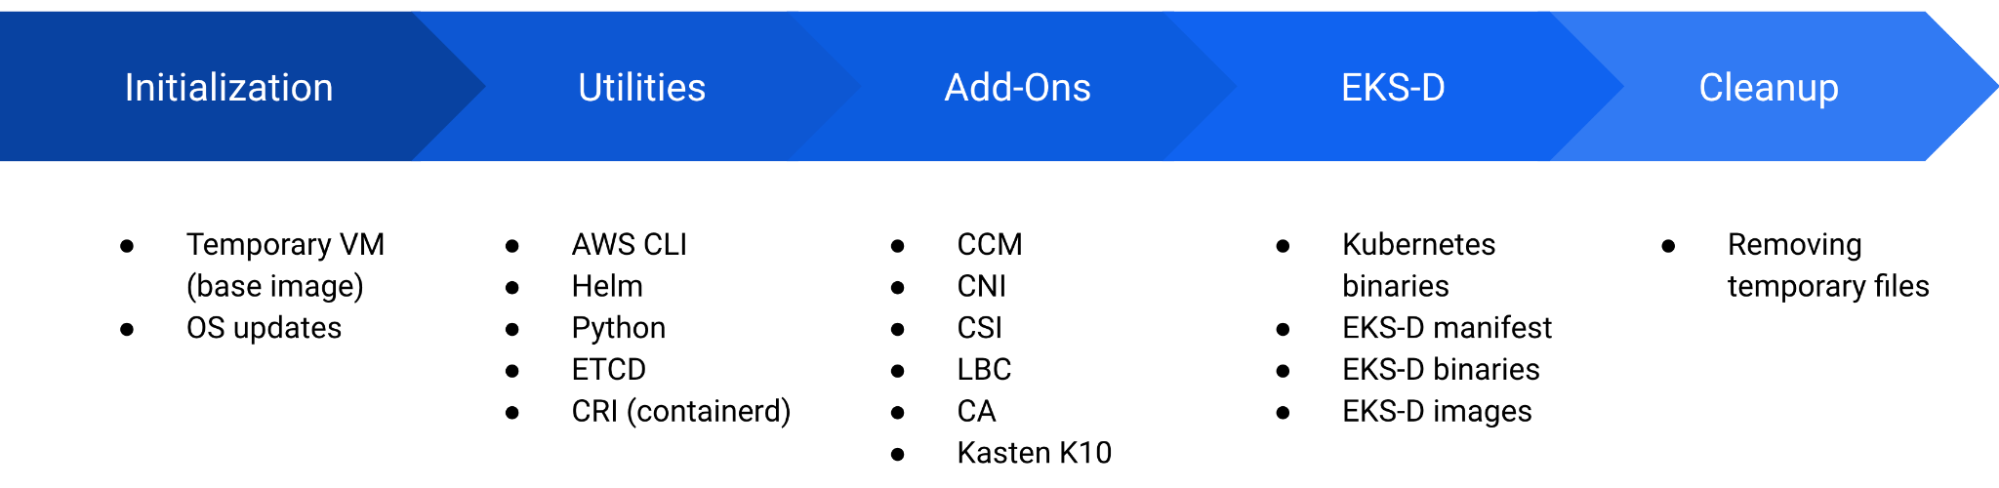
Please note that by default, all utilities and add-ons are installed with their latest released versions – you may change this behavior by editing the project’s bash-scripted files.
In case you are building your own image with the Packer project, you will need to populate the .auto.pkvars.hvl parameter file according to the below guidelines:
- Zadara recommends basing the EKS-D image on the latest Ubuntu 22.04 (available in the zCompute’s marketplace) for security & compliance reasons. As we follow the same practice with our pre-baked images, most of the existing scripting inside the Packer project is Debian-oriented (apt versus yum, etc.) and will not require drastic changes for such an Operating System family. The actual AMI ID can be found on the zCompute console’s Images panel.
- You will be required to provide a Debian-based (like the Zadara’s toolbox or plain Ubuntu) bastion VM to be used by Packer to create the intermediate VM – make sure you can access this VM with regards to routing table and security group (port 22 for SSH should be allowed)
- You will be required to provide a pre-existing subnet ID to be used by Packer’s intermediate VM – make sure the bastion VM can access that subnet with regards to the routing table (usually it’s best to use the same subnet as the bastion VM).
As an example for such a variable file, see the below:
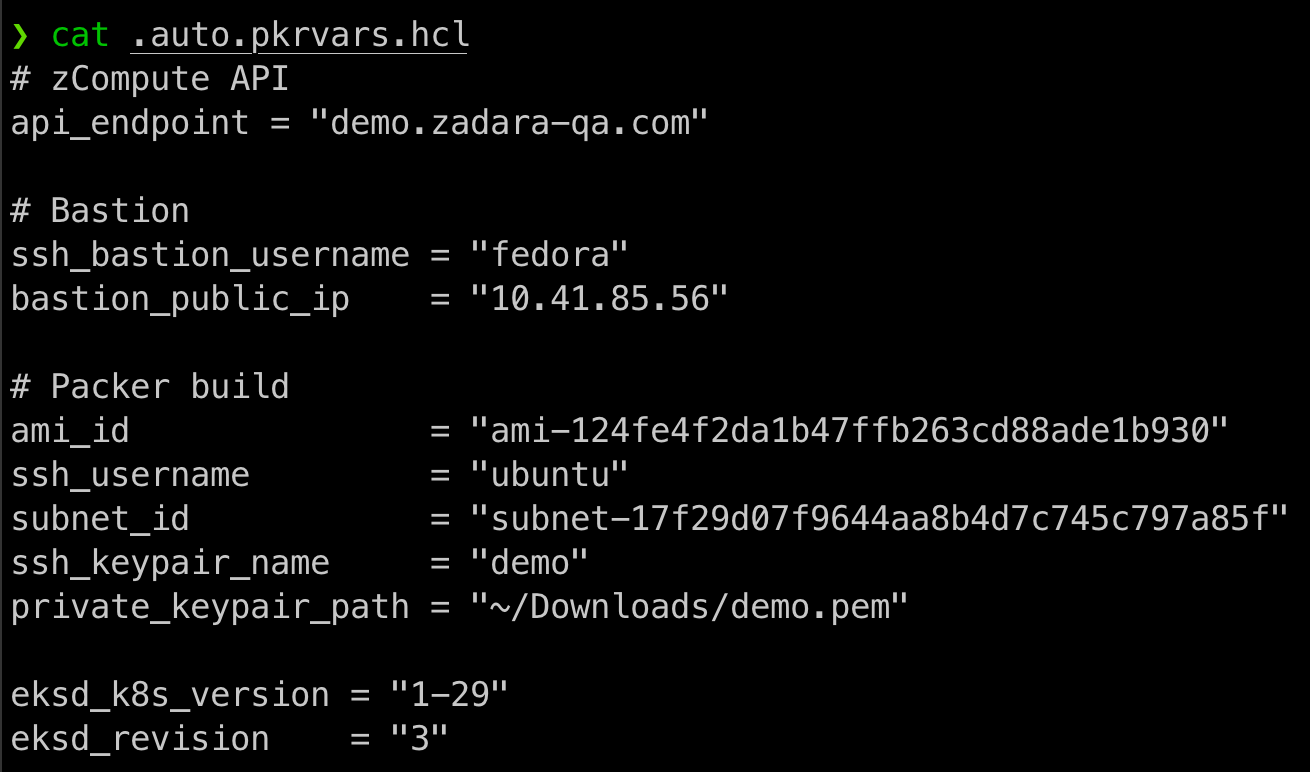
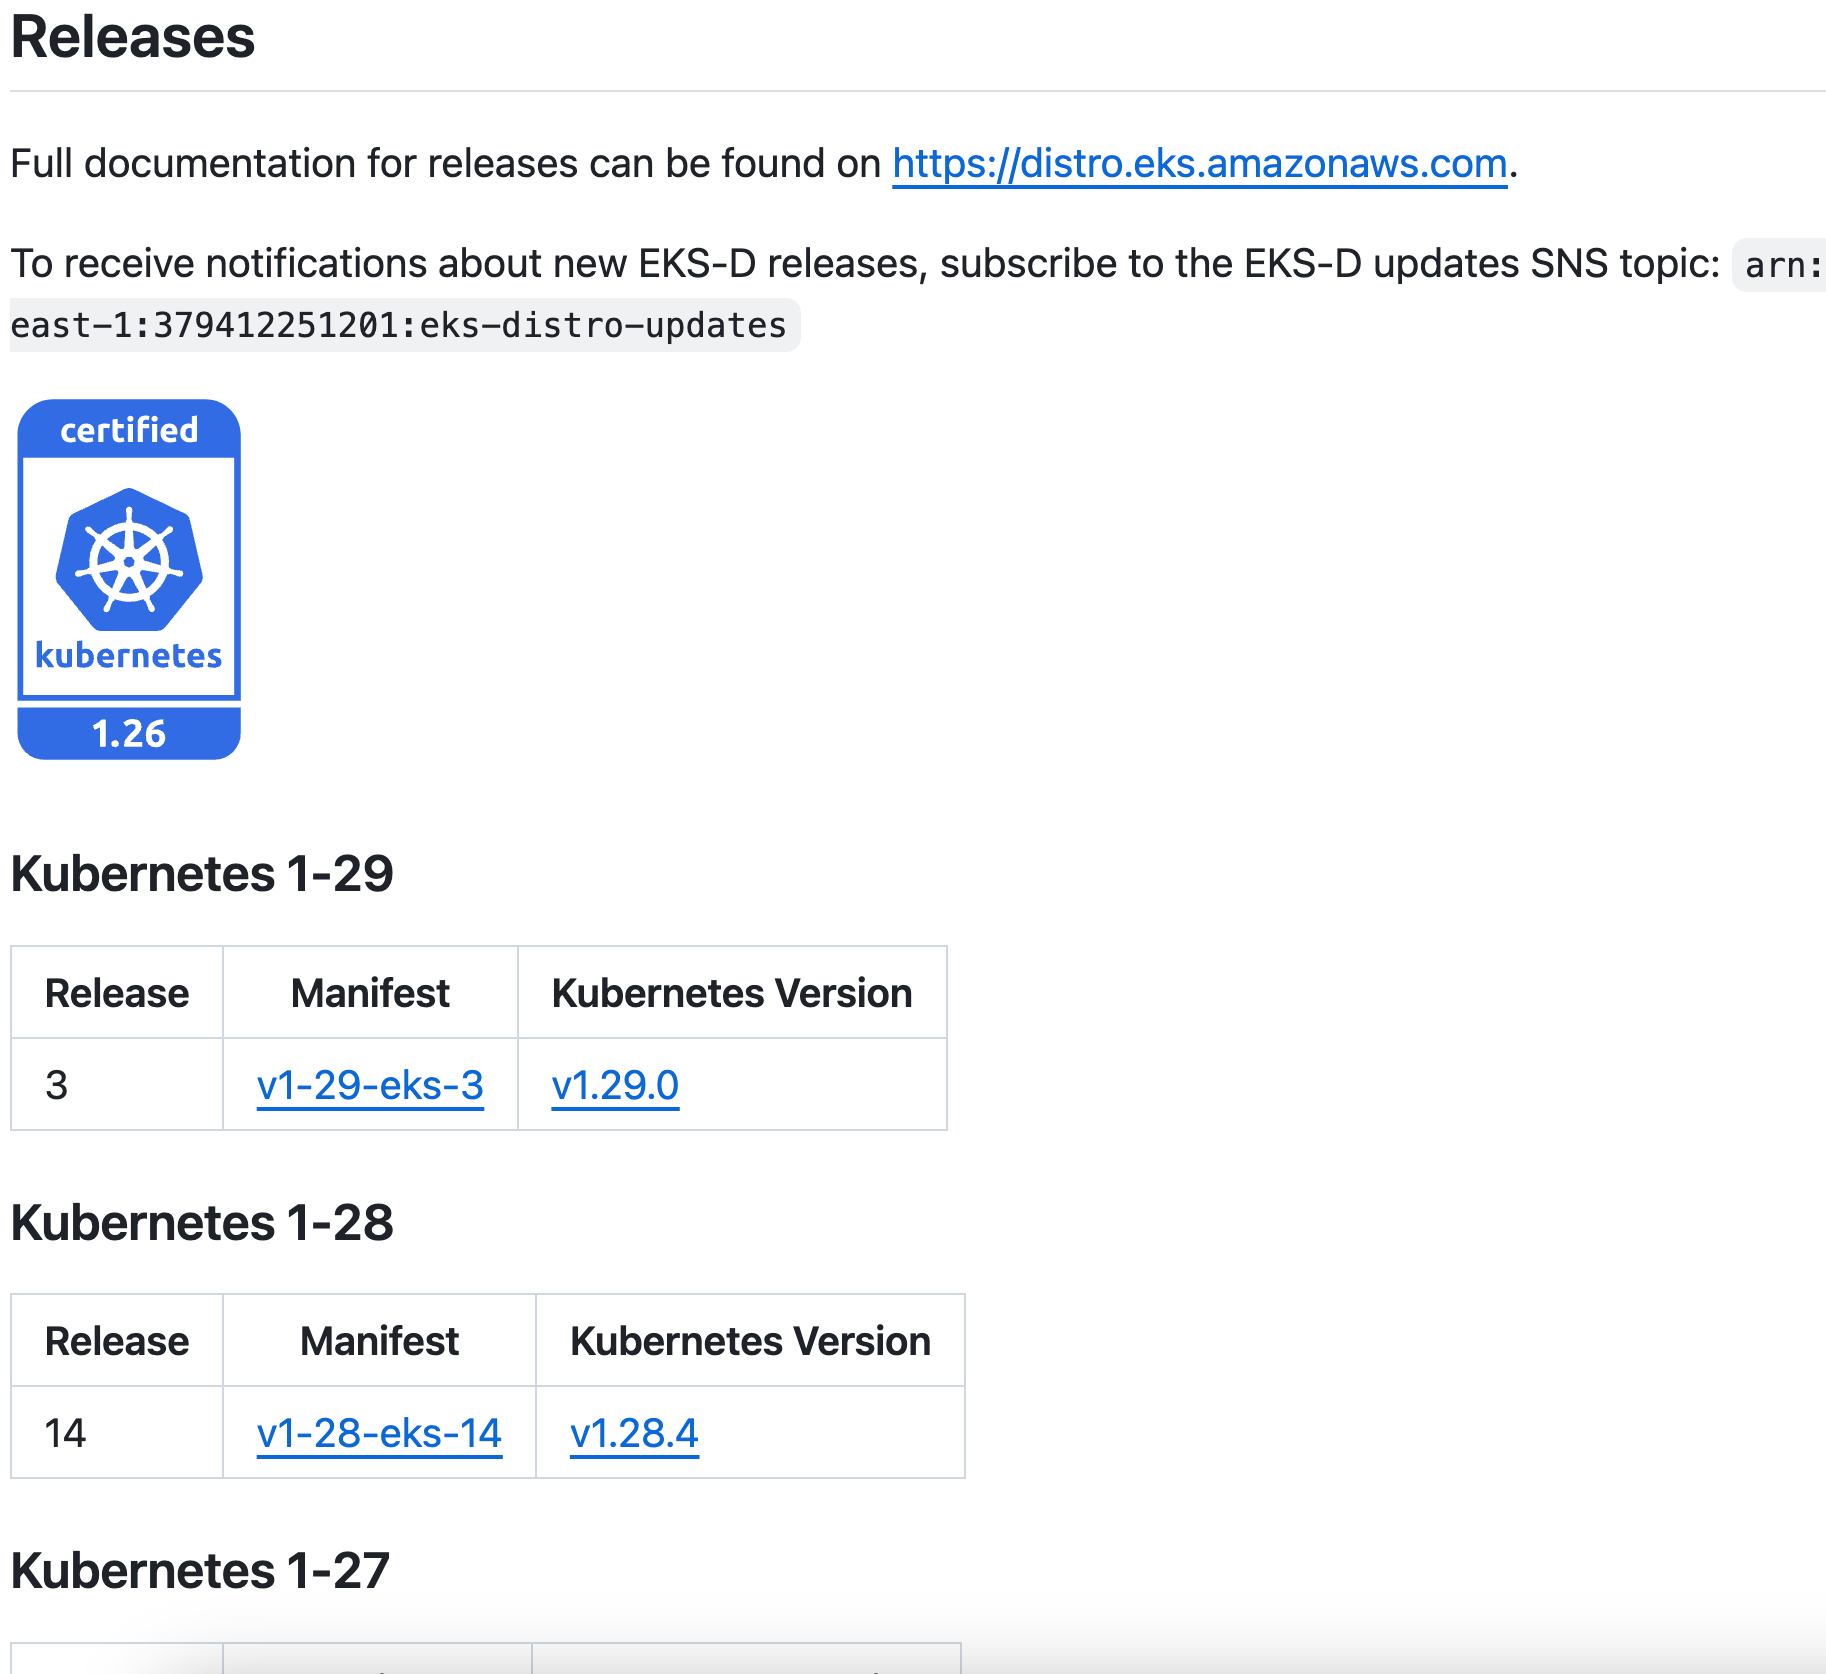
In this example we’re baking the EKS-D image on our demo cloud, using an existing Fedora Zadara toolbox VM with an elastic IP (the bastion’s public IP). The build itself will use the Ubuntu 22.04 AMI on the account’s default VPC & public subnet (note we need the AWS ID of the subnet). Most importantly, we’ve asked to bake EKS-D 1-29 release 3, as can be seen in the EKS-D GitHub repository (note this page may change as it always reflects the latest releases):
As you initiate the build process with packer build . command, note your local AWS profile must point to the relevant zCompute cloud’s AWS CLI credentials (in the below example we’re using an ad-hoc environment variable for that):
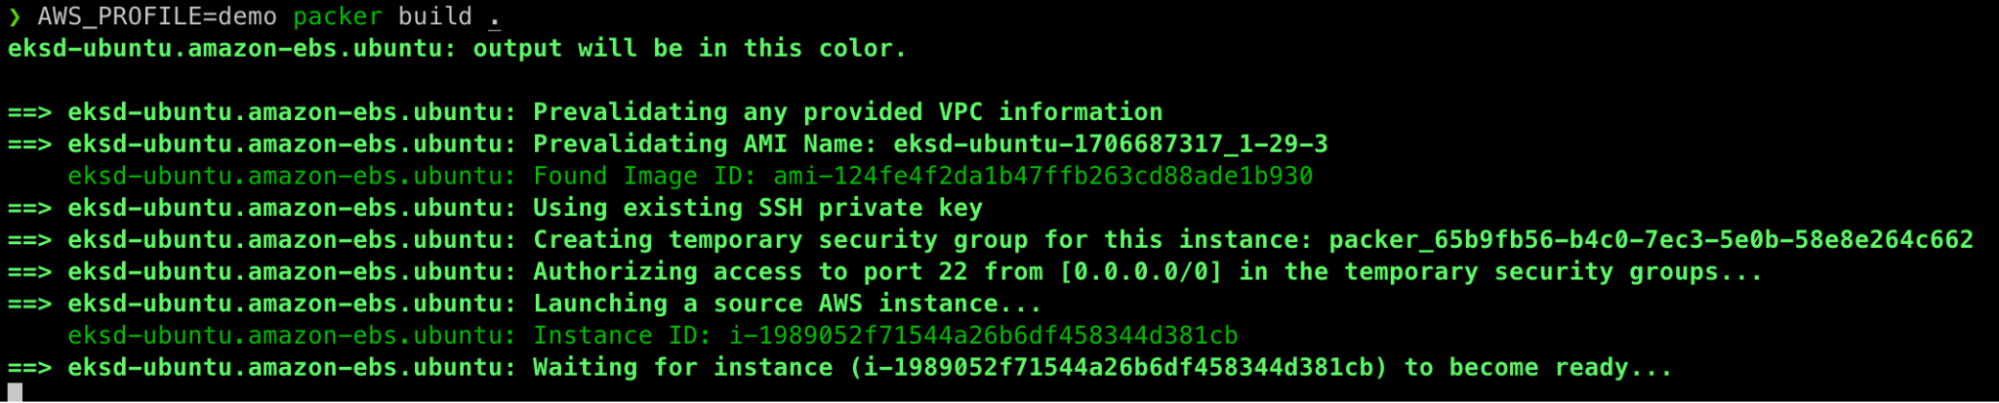
Depending on your content changes, network bandwidth and VM size (default is z8.large), the baking process should take 15-30 minutes to complete, resulting in a fresh AMI:
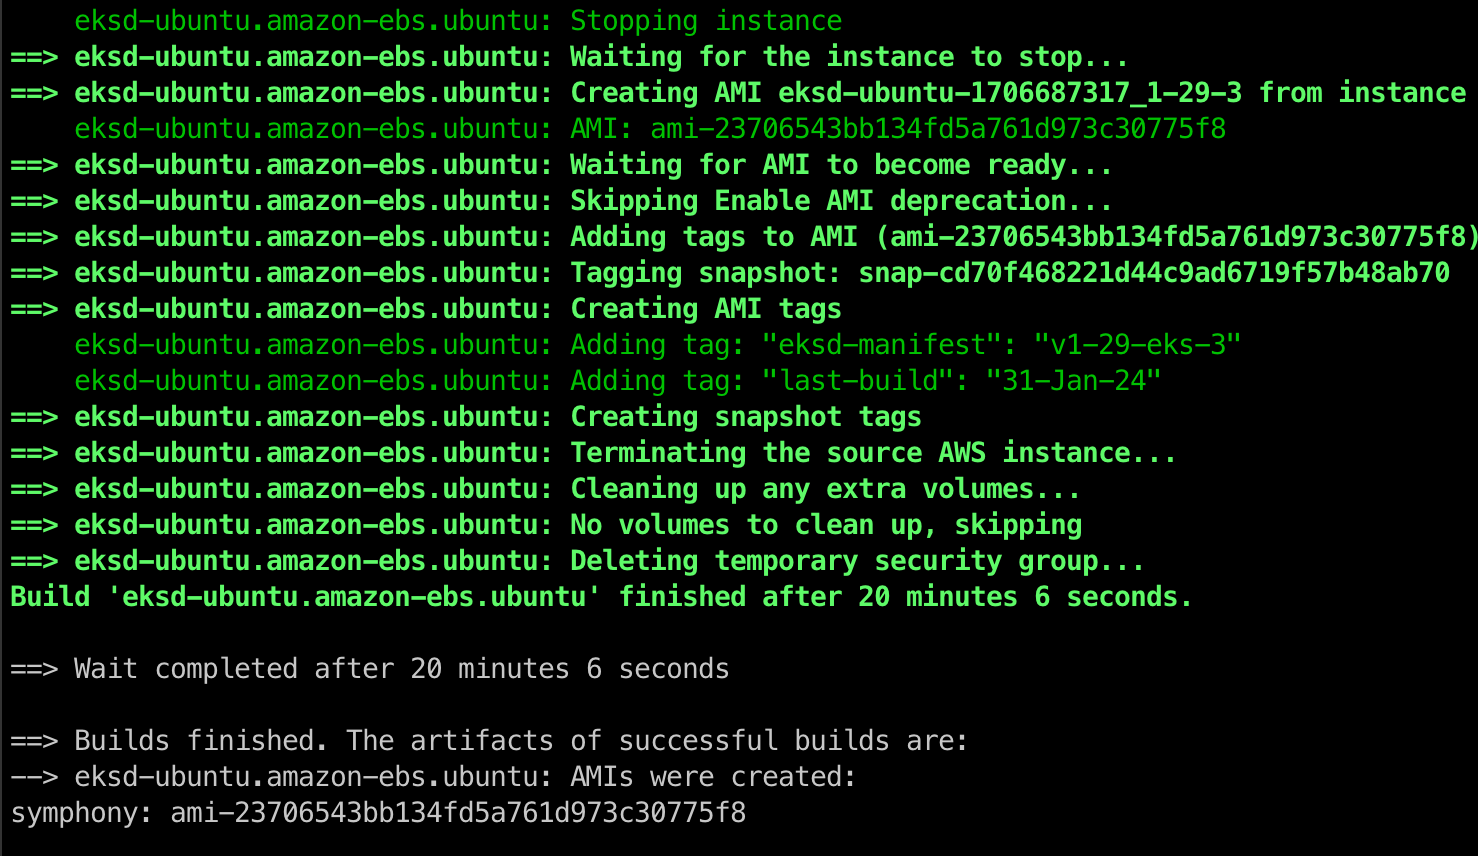
Once over, the new AMI will be available to use within the zCompute consol’s Images panel:

We can now use this AMI ID within a regular EKS-D deployment to specify our customized image.
Placement rules
There is one important factor for a production-grade deployment that is not covered by the deployment script, and that is the ability to add “placement rules” for new VMs inside the Zadara cloud. Think about it as the equivalent of Kubernetes’ anti-affinity rules – you can create a cloud-level rule to ensure that specifically tagged VMs will be placed on different infrastructure nodes, similarly to AWS’s placement groups. The only difference is that with an edge cloud like Zadara, the rule will control the VM placement on the underlying physical nodes rather than a broader Availability Zone’s partition.
To prevent a case of several key instances such as the control plane’s VMs being co-located on the same physical nodes (which may prove problematic in case of infrastructure failure), the general recommendation for such mission-critical workload would be to create a dedicated rule that will direct the cloud’s built-in scheduling based on the user request – either forcefully (“hard” rule, meaning no VM will be created in violation of the rule) or on a best-effort (“soft” rule):
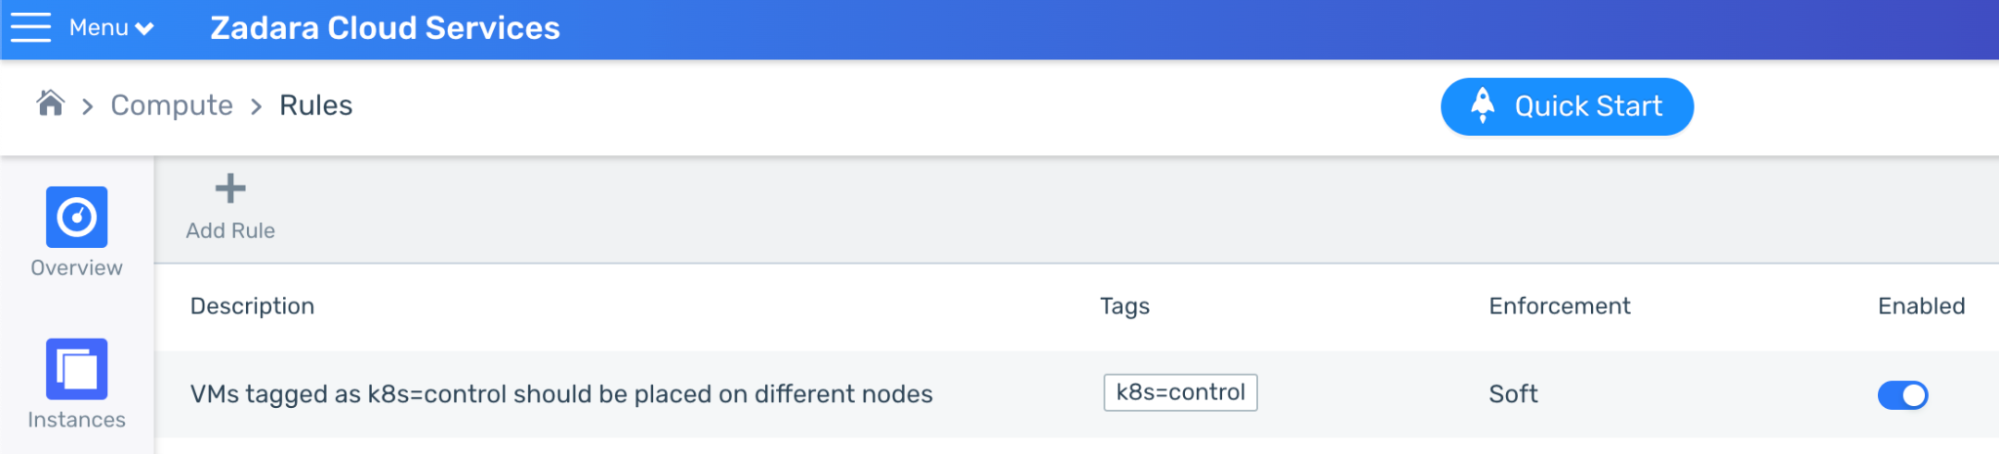
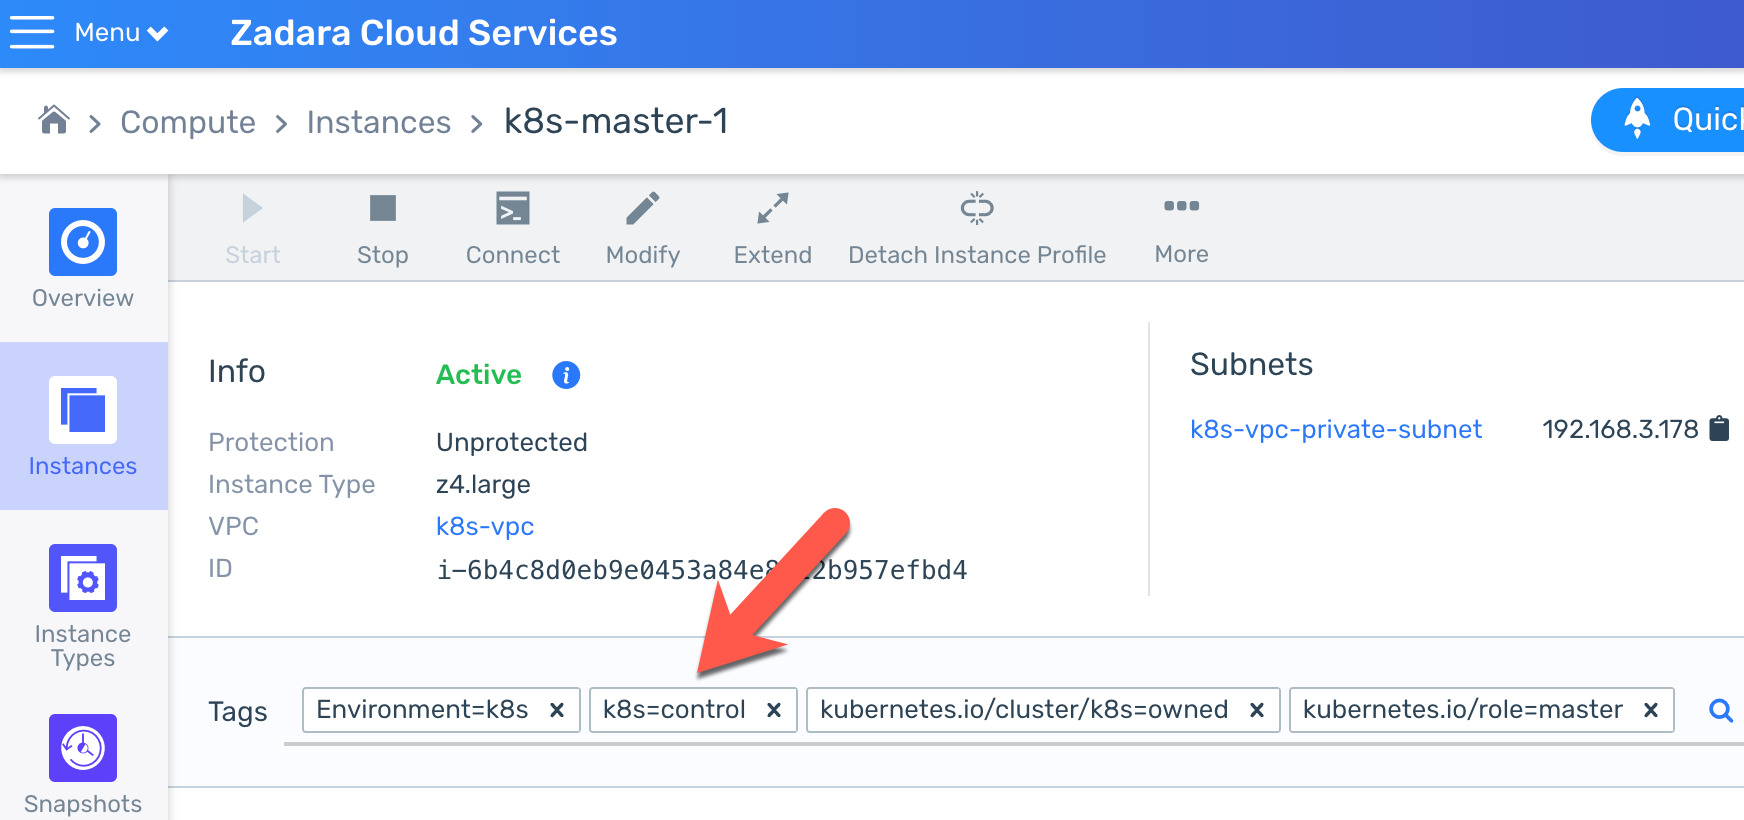
In this example I’ve created a soft rule to direct the Zadara cloud to place each control-plane VM in my “k8s” cluster on different infrastructure nodes:
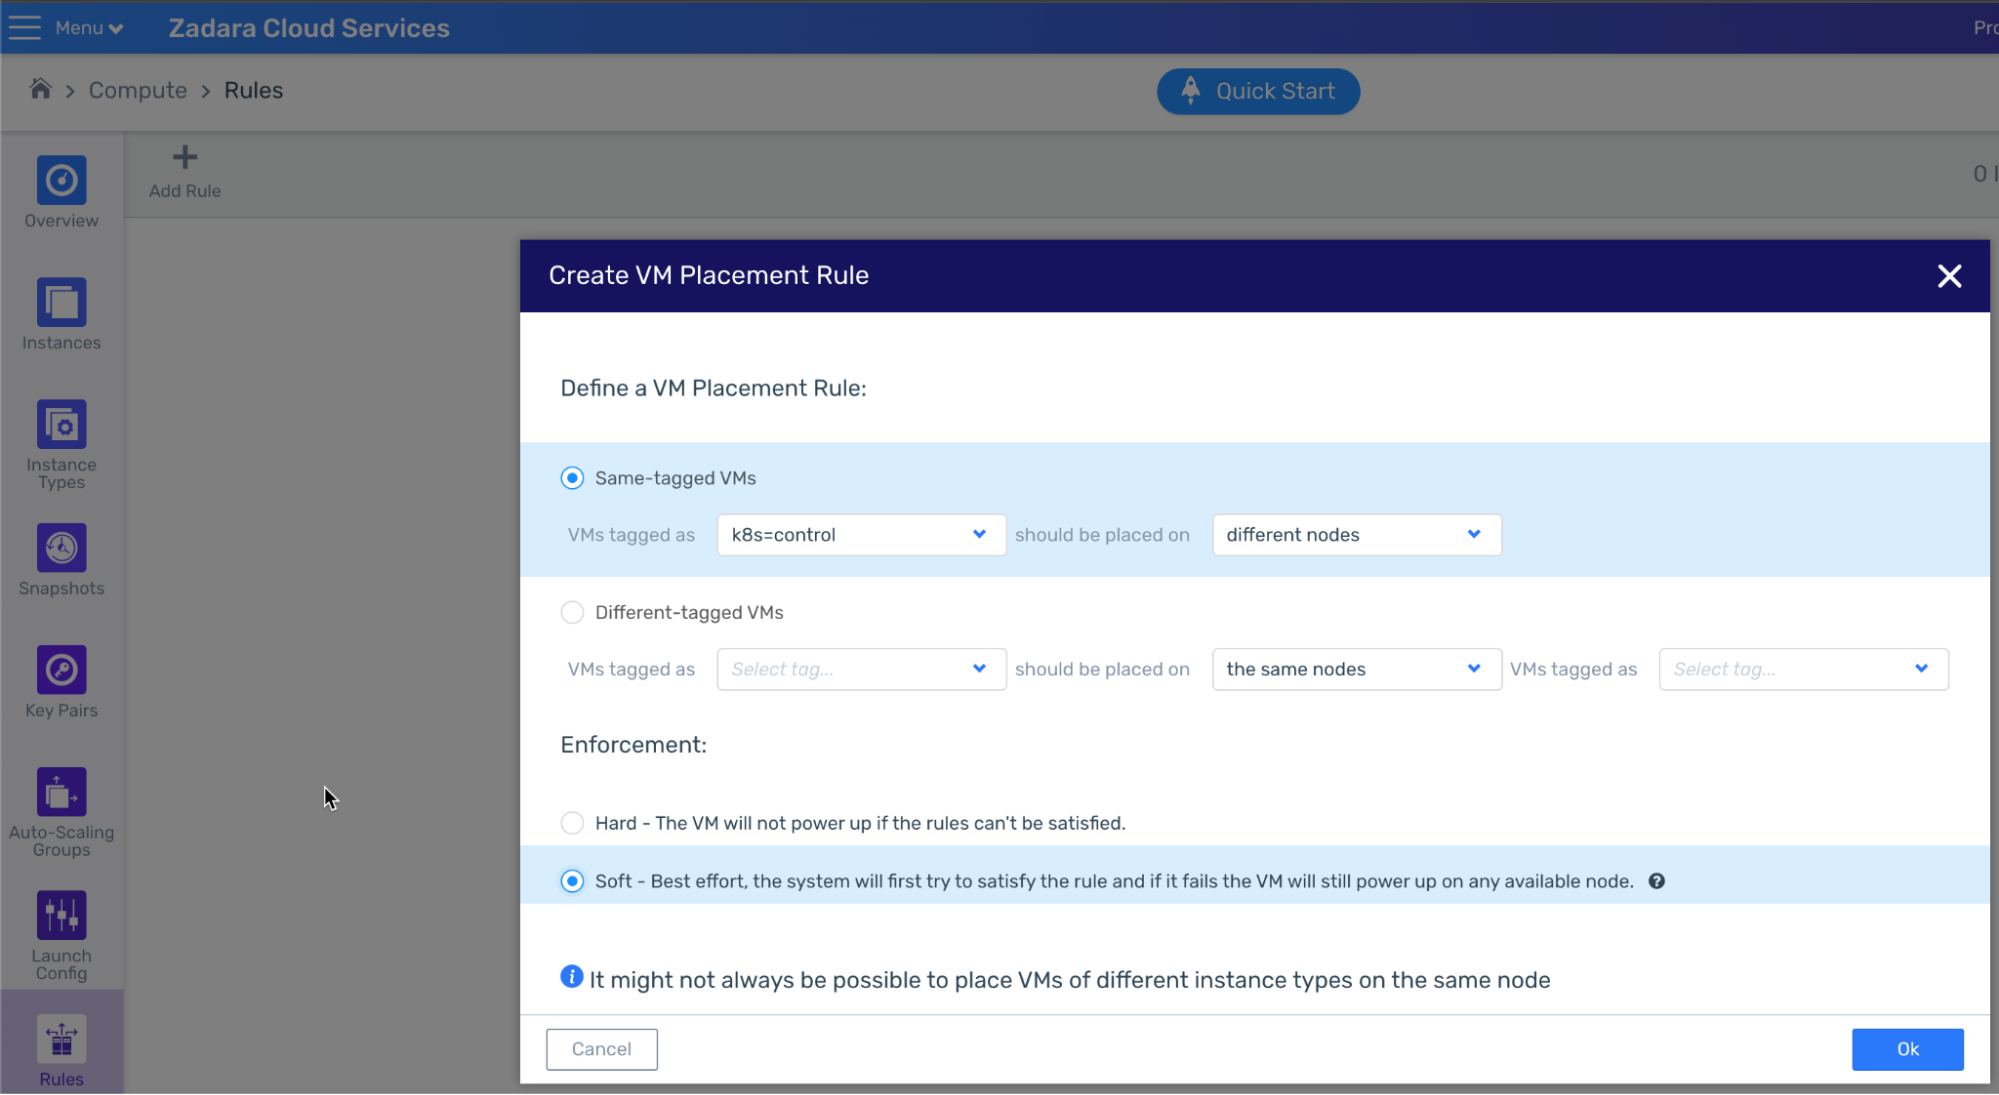
We could have used any existing tag or created a new one before we even deployed the Kubernetes cluster – this specific tag will always be created for any new control-plane VM based on the environment (cluster) name as the key and the control/data plane type as the value:
Note we used a soft rule rather than a hard rule, this is really up to your discretion based on your use case. After years of running production workloads on regular clouds I personally actually prefer hard rules as they allow you to fail fast and fix any issue as soon as possible, however, the circumstances can be different with edge clouds – for example, maybe this cloud only contains few big infrastructure nodes, so a hard-rule might prevent us from spawning master nodes (either immediately or later on). Since end-users are not able to observe the cloud’s underlying infrastructure nodes or their capacities, a hard rule can turn up to be a double-edged sword in some of these cases (especially with smaller edge clouds).
With this warning in mind, placement rules are an important protection layer for sensitive production workloads such as the Kubernetes control-plane VMs, just remember to use a cluster-level tag as the basis for your rule, otherwise you may find that the same rule will apply for all master nodes across every Kubernetes cluster in your environment…
Final thoughts
In this blog post we’ve reviewed various customization techniques that are part of the EKS-D solution, as well as one that is not an internal part of the solution but relevant for establishing a production-grade cluster on the Zadara cloud. There’s always room for more knowledge and deeper understanding, but I hope that this blog post and entire series have helped you realize how easy it is to run Kubernetes on the Zadara cloud – stay tuned for more content, tips & tricks on our zadara-examples GitHub repository!