In an age where cyber threats such as ransomware are rampant, creating immutable backups is crucial for safeguarding your organisation’s data. The combination of HYCU and Zadara Object Storage provides a robust solution for this purpose. In this Blog we are going to explore how we can deliver an immutable backup and recovery platform.
Why Zadara and HYCU form a good recovery capability
- HYCU is a leading enterprise-grade backup and recovery solution known for its flexibility, advanced features, and support for various storage platforms.
- Zadara Object Storage is a high-performance, scalable and secure storage platform offering Object Lock functionality, which supports immutable backups. Immutable storage prevents data from being modified or deleted within a specified retention period, ensuring compliance and protection against ransomware.
Together, these solutions allow organisations to achieve secure, reliable and compliant data protection.
Best Practices
- Use Multi-Factor Authentication (MFA): Protect access to both HYCU and Zadara with MFA to prevent unauthorised changes.
- Define Retention Policies Carefully: Avoid setting excessively long retention periods unless necessary, as these settings cannot be modified retroactively.
- Regularly Review Audit Logs: Both HYCU and Zadara offer logging capabilities to track backup and storage activities.
- Integrate with Compliance Standards: Ensure that your immutable backups meet legal and industry-specific regulations such as GDPR, HIPAA, or CCPA.
Ongoing: Monitor and Manage Backups
- Verify Backup Integrity
- Use HYCU’s built-in validation tools to ensure that backups are complete and recoverable.
- Monitor Immutability
- Regularly check the retention policies in HYCU to confirm compliance with your data protection strategy.
- Perform Recovery Drills
- Test your ability to restore data from immutable backups to ensure preparedness for disaster recovery scenarios.
Step-by-Step Guide
Step 1: Configure the Zadara Object Storage
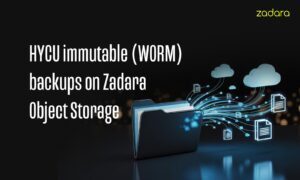
- Set up a Container with Object Lock enabled
- Log in to the Zadara Object Storage Management User Interface.
- Navigate to the Console section and Add a new container.
- Enable the Object Lock feature during bucket creation. This will allow the container to support Write Once, Read Many (WORM) policies.
- For this example I’m going to create 2 containers – one for backup and another for archiving.

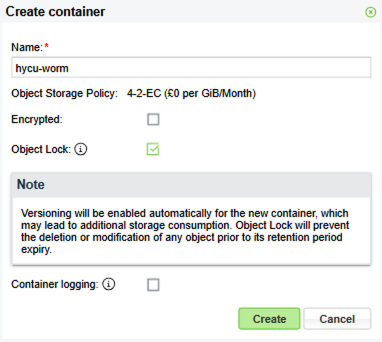
- Locate Access Credentials
- The Access Key, Secret Key and API Endpoint for the Object Store can be found under “User Information” by clicking on the username at the top-right corner of the UI. These credentials will be used by HYCU to authenticate and interact with the Zadara container.
- Note: For internal/private access, select the Front End API endpoint. If using a Public IP address and URL, select the Public API endpoint.

- Apply an Object Lock Retention timeframe to the containers
This step is crucial to enable the Object Lock retention timeframe to be set on all objects that will be written into the container. The timeframe set here will be the minimum retention period. If required, the retention timeframe can be set to a longer period in the HYCU Backup Policy.
Note: The following steps require the AWS CLI tool to be used (‘aws s3api’ specifically). More information can be found here.
a. Configure your ‘.aws/credentials’ file with a section as follows:
[ngos_user]
aws_access_key_id = <your key here>
aws_secret_access_key = <your key here>
b. Set up the variables to be used e.g.:
- user@users-MacBook ~ % AWSUSER=ngos_user
- user@users-MacBook ~ % ENDPOINT=https://vsa-<your ngos URL here>.zadarazios.com
- user@users-MacBook ~ % BUCKET=<your container name here>
c. Apply the config to the container (change the “Days” value as needed):
a. user@users-MacBook ~ % aws s3api –profile $AWSUSER –endpoint-url=$ENDPOINT put-object-lock-configuration –bucket $BUCKET –object-lock-configuration ‘{ “ObjectLockEnabled”: “Enabled”, “Rule”: { “DefaultRetention”: { “Mode”: “COMPLIANCE”, “Days”: 2 }}}’
d. To check the config has been applied correctly:
- user@users-MacBook ~ % aws s3api –profile $AWSUSER –endpoint-url=$ENDPOINT get-object-lock-configuration –bucket $BUCKET
e. Expected output:
{
“ObjectLockConfiguration”: {
“ObjectLockEnabled”: “Enabled”,
“Rule”: {
“DefaultRetention”: {
“Mode”: “COMPLIANCE”,
“Days”: 2
}
}
}
}
Note: Return to this final step later, once some data has been backed up:
f. To check one of the newly backed up objects from HYCU to see what the retention date is:
- user@users-MacBook ~ % aws s3api –profile $AWSUSER –endpoint-url=$ENDPOINT get-object-retention –bucket $BUCKET –key bkpctrl/<uid>/<folder>/…/<object name>
g. Expected output:
{
“Retention”: {
“Mode”: “COMPLIANCE”,
“RetainUntilDate”: “2026-01-17T17:51:52+00:00”
}
}
4. Verify Object Lock
- More information, along with some example steps to follow, can be found in the Zadara User Guide here.
Step 2: Integrate Zadara Object Storage with HYCU
Note: If Archiving is to be used it will be necessary to disable tagging in the HYCU Backup Appliance. This is done as follows:
- SSH into the HYCU Backup Appliance.
- Edit the config.properties file in /opt/grizzly:
[hycu@hycu-appliance ~]$ sudo vi /opt/grizzly/config.properties
Add this line:
target.cloud.skip.tagging.endpoint.suffixes=.zadarazios.com
Note: If the NGOS uses a different domain suffix then update the above line accordingly, replacing ‘zadarazios.com’.
Save and quit vi, then restart the grizzly service:
[hycu@hycu-appliance ~]$ sudo systemctl restart grizzly
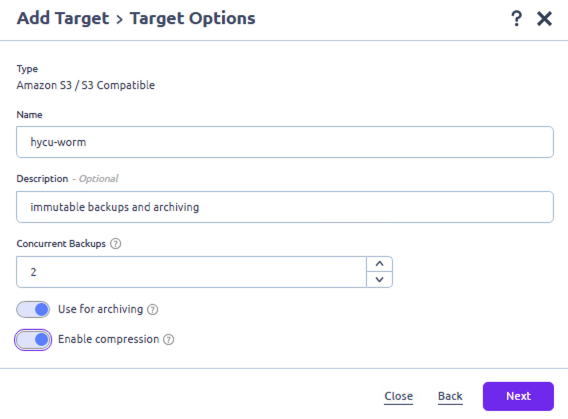
- Add the Zadara Container as a Target in HYCU
- Firstly, ensure that you are using HYCU version 5.2.1 or later.
- Open the HYCU Web Console and navigate to Targets on the left menu.
- Click + Add.
- Choose Amazon S3 / S3-Compatible as the storage type.
- Enter a Name for this storage component.
- Enter a Description if required.
- Set the desired quantity of concurrent backups.
- Note: Only enable Use for Archiving on an additional container. The container to be used for Backup jobs should not have this enabled.
- Enable compression if required.
- Next.
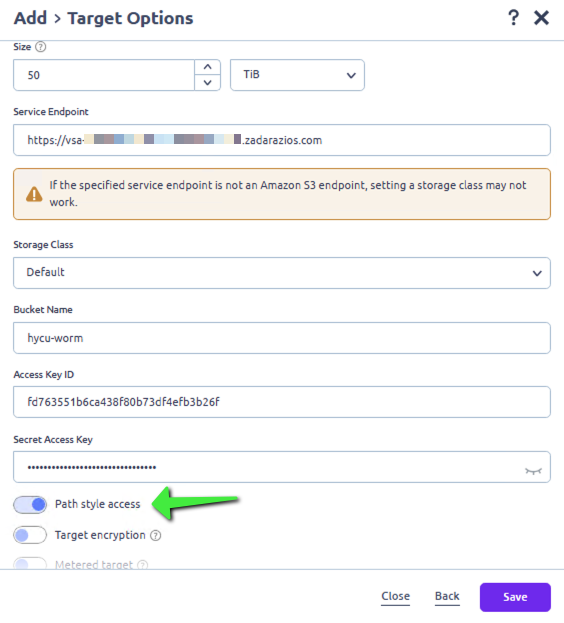
- Specify the Size of the repository (this can be altered later as needed).
- For Service Endpoint enter the API endpoint URL for Zadara (e.g., https://vsa-<your Zadara Object Storage URL here>.zadarazios.com).
- Leave the Storage Class as Default.
- Under Bucket Name enter the name of the object locked container created in Step 1.
- Enter the Access Key ID and Secret Access Key details.
- Important: enable Path style access
- Disable Metered target as it’s not required.
- Save the new Target.
- If required, repeat these steps to create a 2nd target/container and enable archiving.


After a short while the Target will be created. Note the shield icon to indicate that Object Lock is enabled on the container.

Step 3: Create a Backup Policy which utilises immutability
- Configure Archiving (if required)
- In HYCU, navigate to Policies on the left menu.
- Click Archiving
- Click + New
- Enter a Name for the Policy.
- Add a Description if required.
- Options: set as required
- Start at: specify a time
- Time Zone: specify a zone
- Recur every: specify a value
- Retention: specify a value
- Target: select the relevant target created for Archiving
- Save
- Define a Backup Policy
- In HYCU, navigate to Policies on the left menu.
- Click + New.
- Enter a Name for the Policy.
- Add a Description if required.
- Options: Select Archiving.
- Configure the RPO, RTO and Retention settings as required.
- Select the Backup Target Type: Target.
- Configure Backup Threshold and Backup Chain Length as required.
- Archiving: select the relevant Data Archive from the dropdown list.
- Click Save.
- Connect to a vCenter Server to back up VMs
- In HYCU, navigate to Administration > Sources > Hypervisor.
- Click + New
- Enter the required information to connect: URL / Username / Password. Next.
- Confirm the vSphere details are correct. Next.
- If validation is successful, Save.
- The list of Virtual Machines in the vSphere Cloud should appear.
- Backup some VMs
- In HYCU, navigate to Virtual Machines.
- Select the VMs which are to be backed up by the newly created Policy.
- Click Set Policy.
- Highlight the relevant Policy and click Assign.
- Monitor the progress of the backups in Jobs.
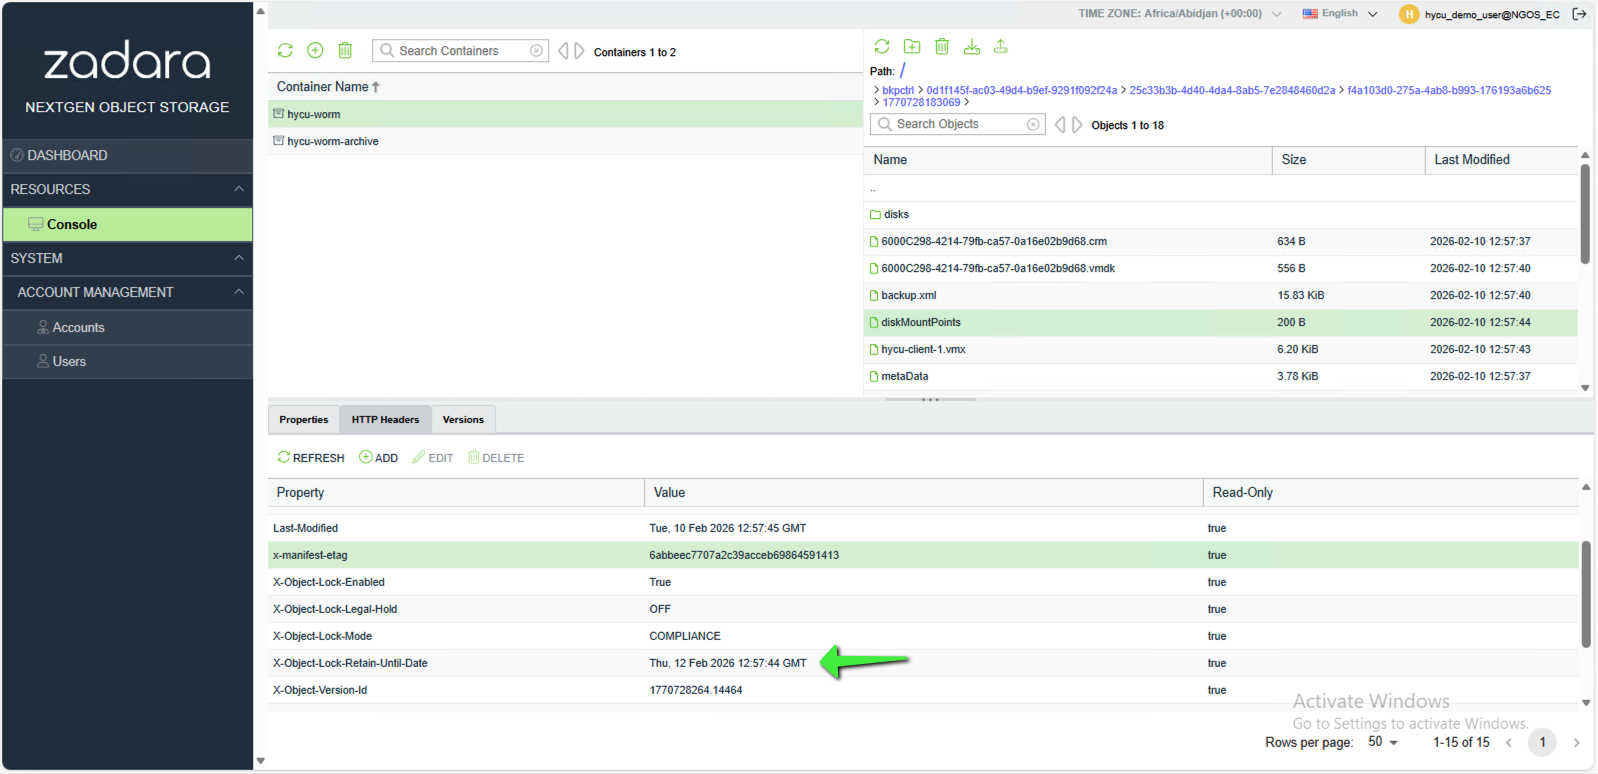
- The Objects can be viewed in the Zadara Object Storage User Interface or using a 3rd party software application such as S3 Browser.
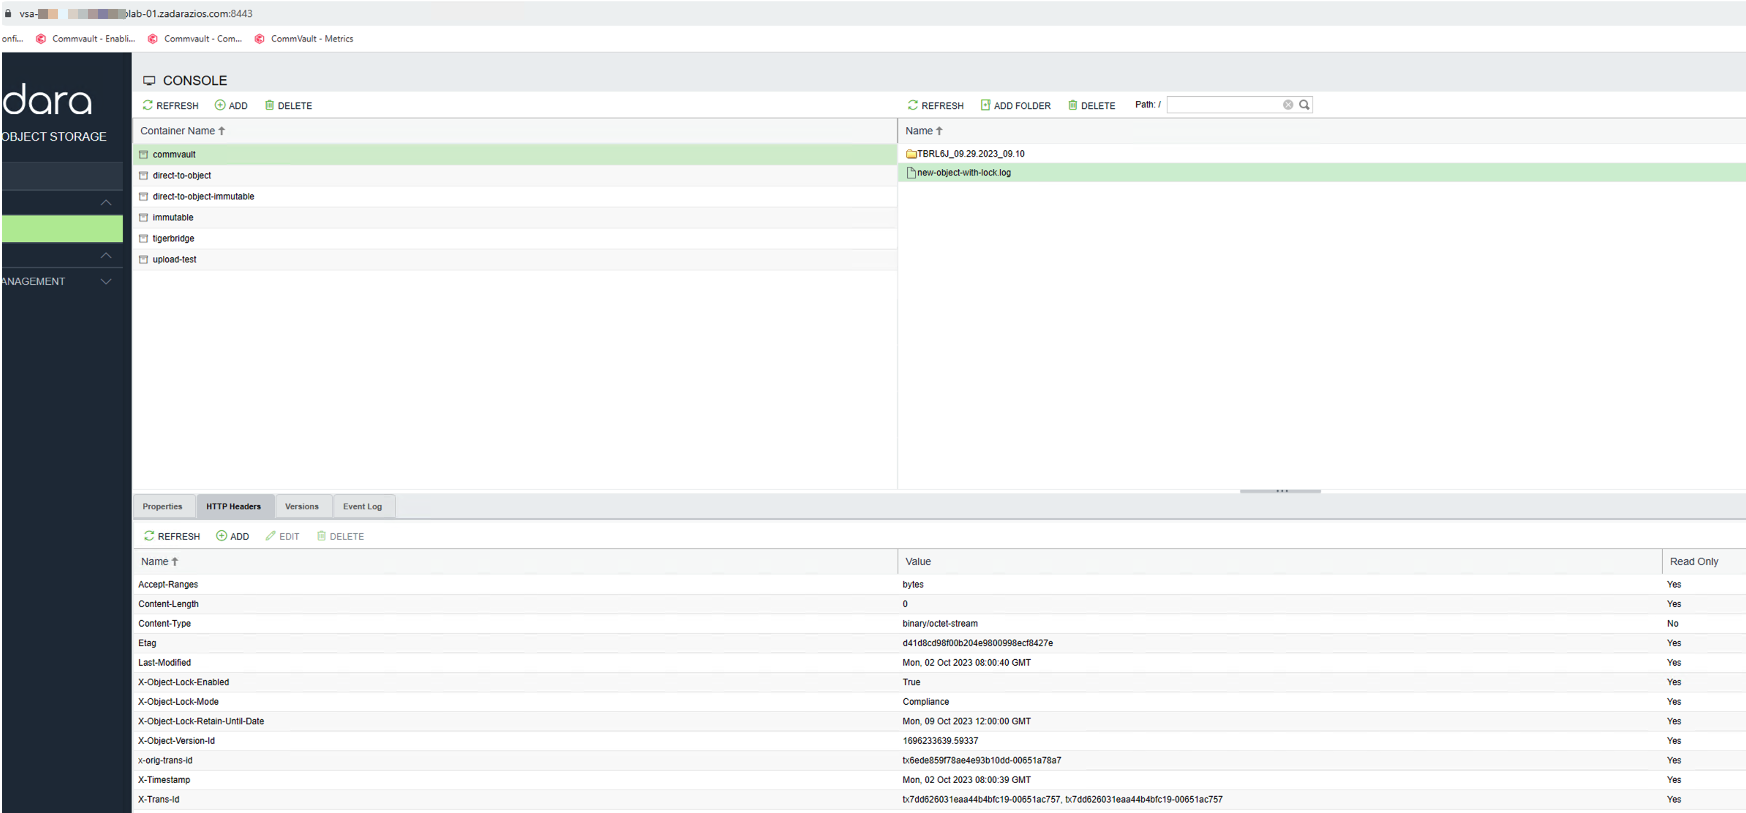
- The Object-Lock-Retain-Until-Date (i.e. the immutable retention date) date can be found under the HTTP Headers tab in the South pane for each Object.
You now have immutable backups configured.
Step 4: Testing immutability and recovering impacted data
As detailed in Step 1.4, when an Object has a retention date and time set on it which is in the future it cannot be deleted. In a situation where a malicious attack has occurred the objects will appear to have been deleted to fool the attacker. However, the objects are simply replaced with delete markers which mask the objects. The following section describes this scenario and how to recover the “deleted” objects.
More detailed information regarding versioning and object lock can be found here:
- Versioning (deleting an object) – https://guides.zadarastorage.com/ngos-guide/latest/ngos-console.html#deleting-an-object
- Object Lock – https://guides.zadarastorage.com/ngos-guide/latest/ngos-console.html#object-lock-containers
When attempting to delete a locked object from the CLI using the API command, the operation is blocked:
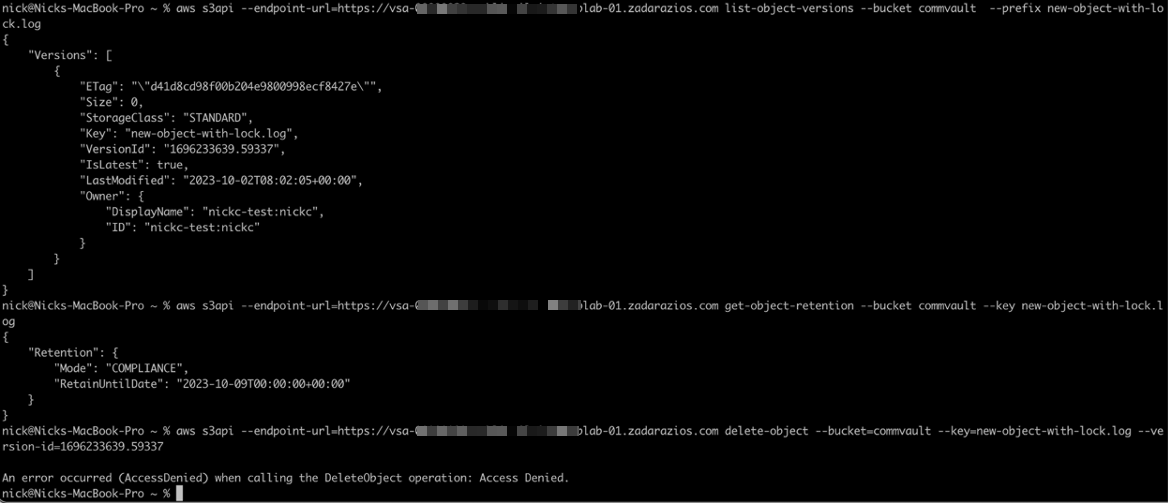
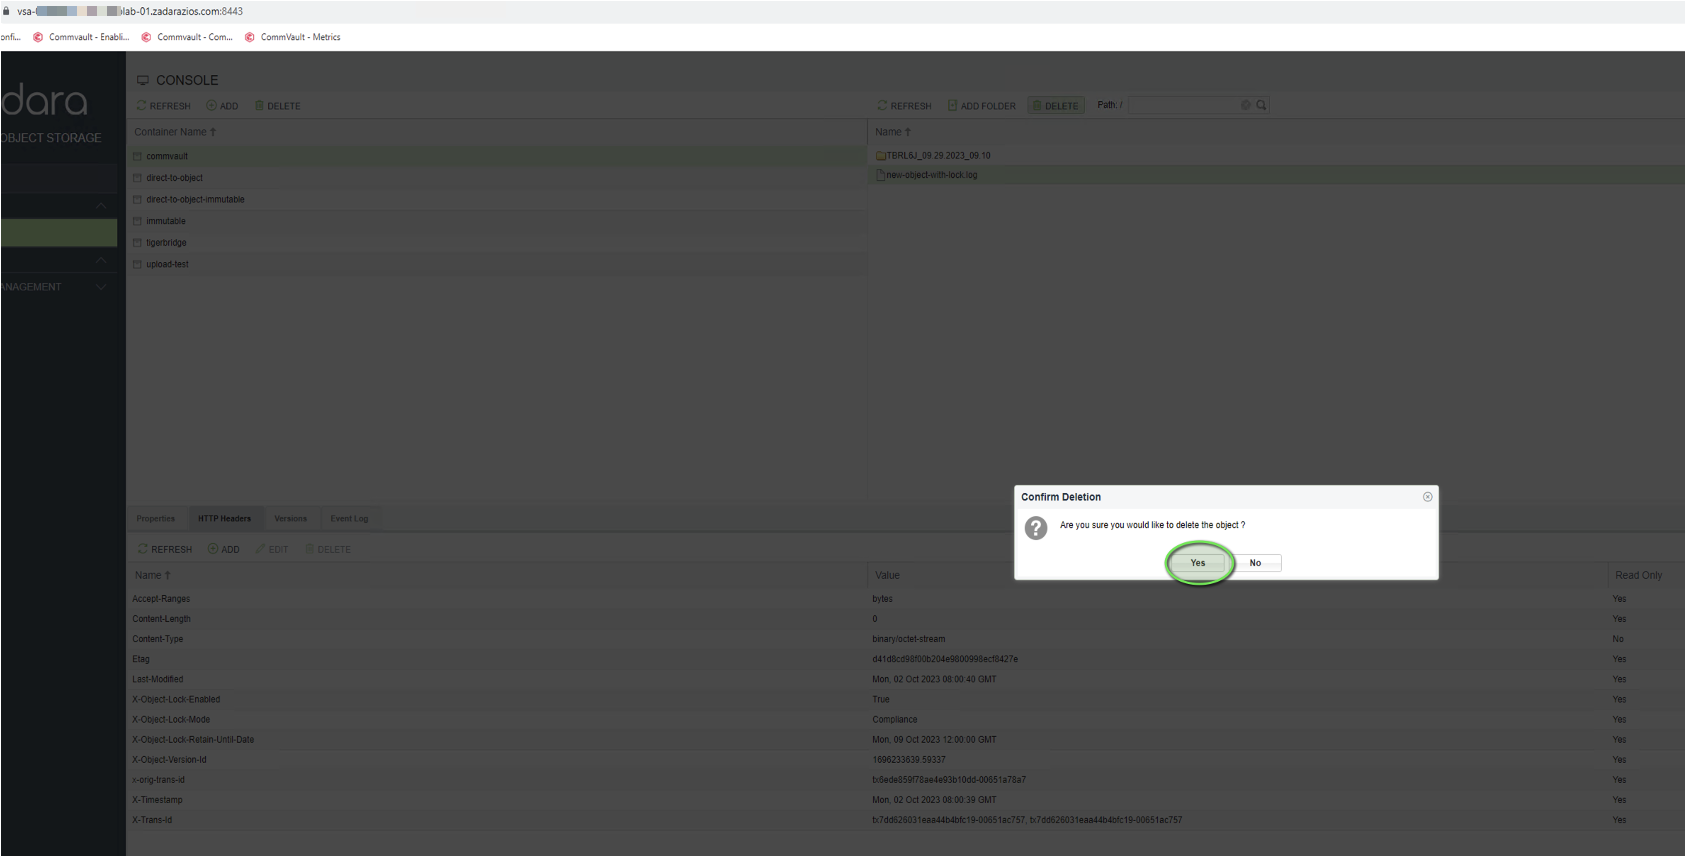
However, in the GUI, the delete request can be processed and appears to be successful.
Note the version ID for later (ending 59337):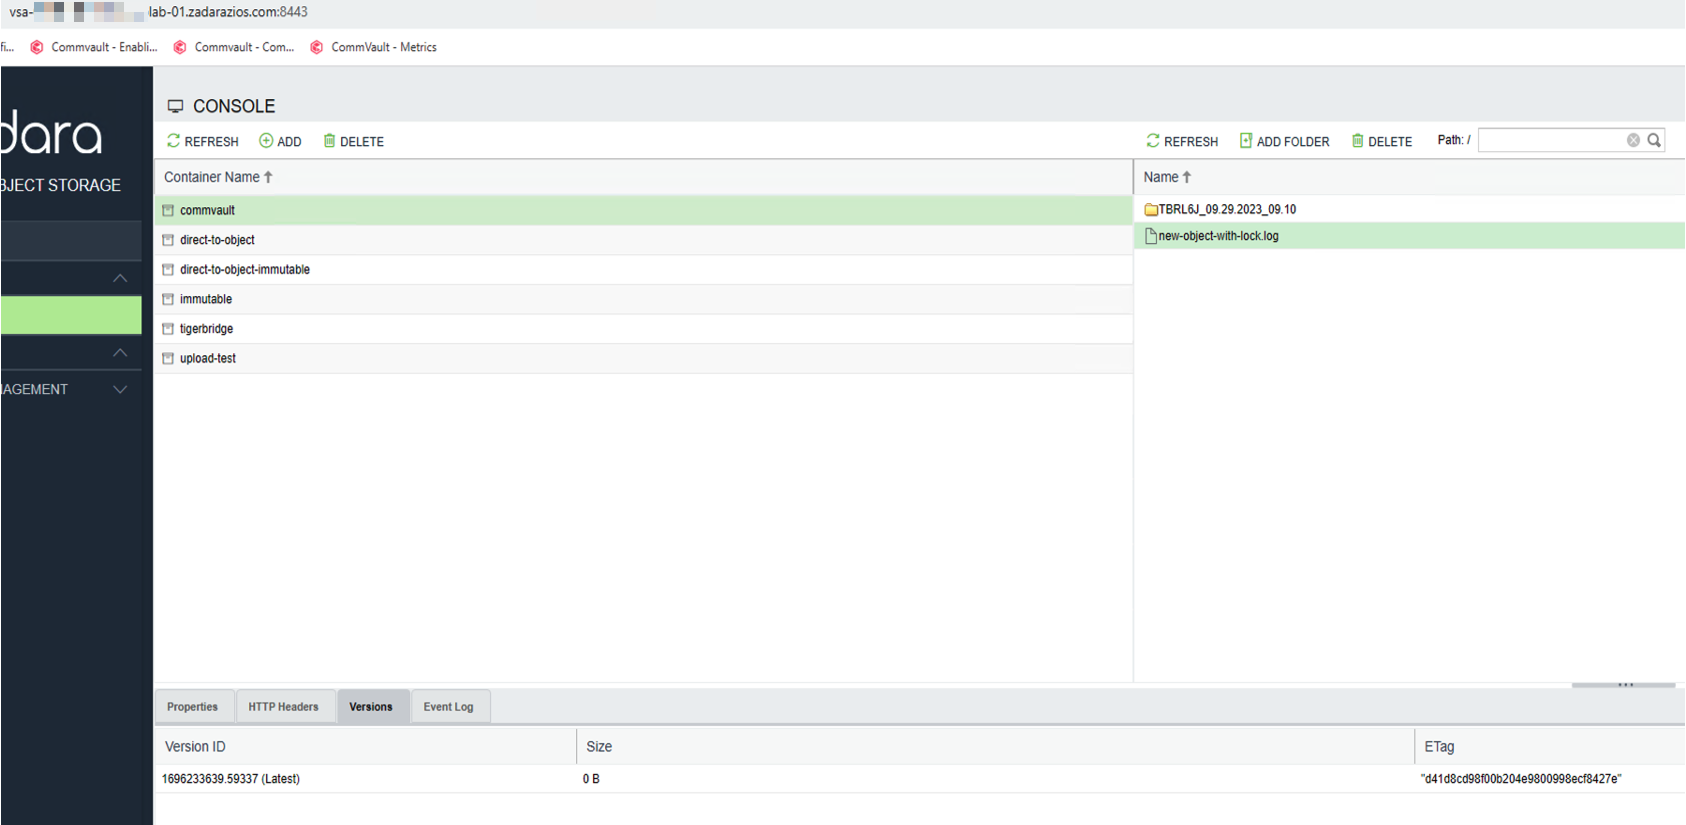
The X-Object-Lock-Retain-Until-Date is in the future:
Delete the Object in the UI and it appears to be successful:
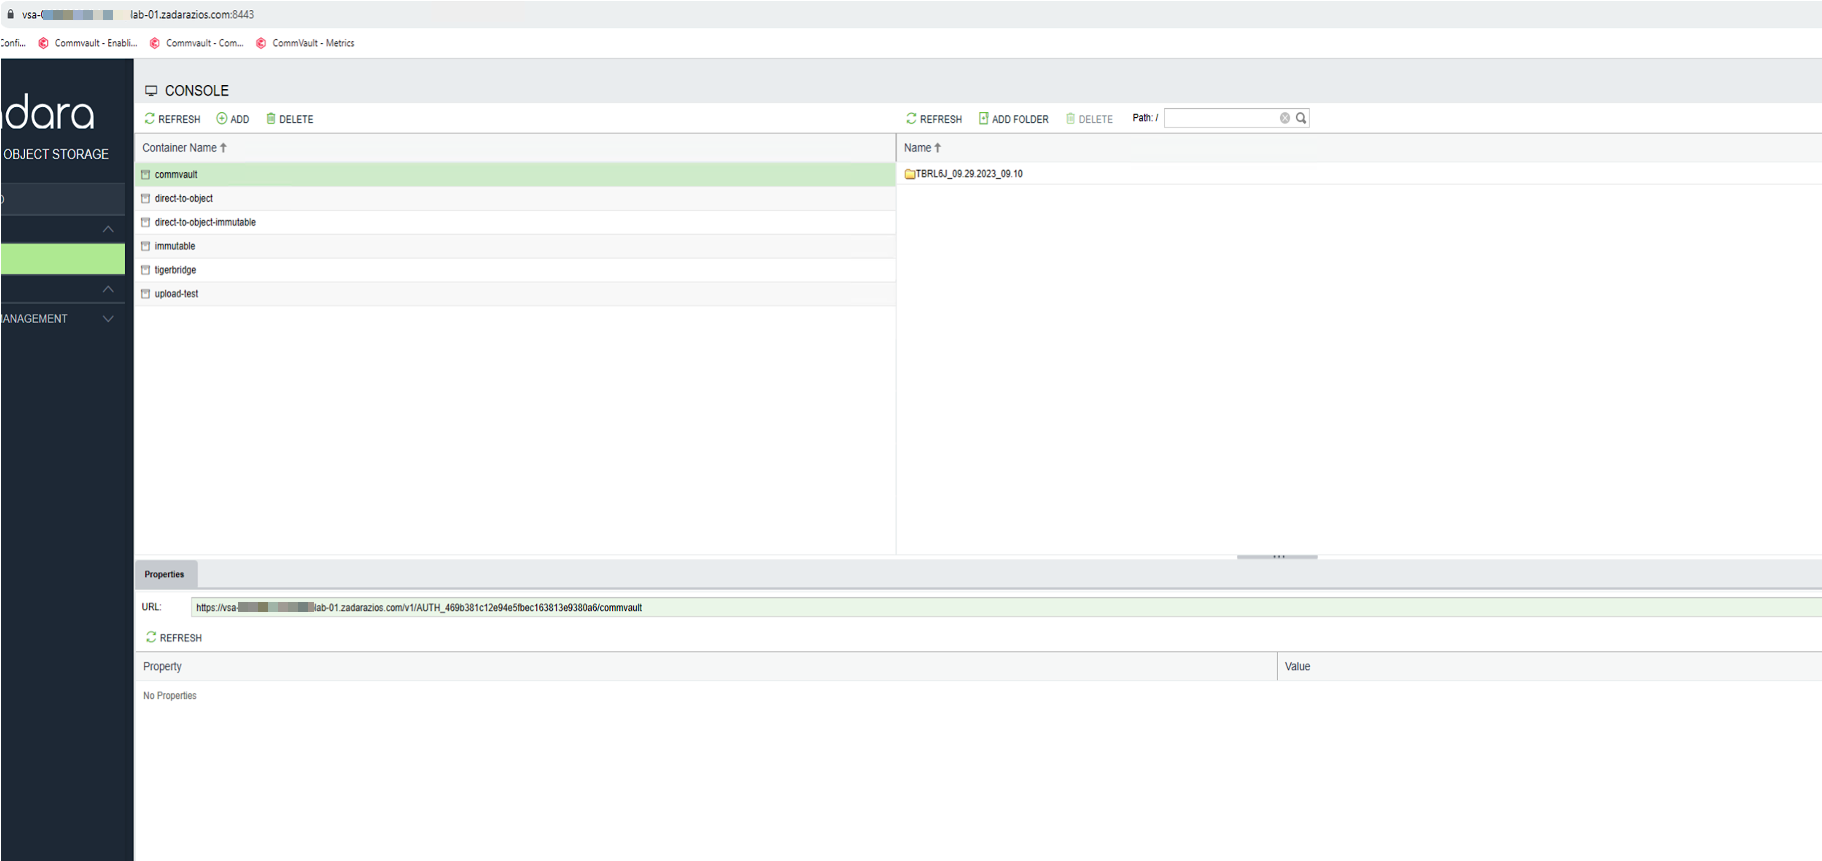
The object no longer appears in the GUI:
However, the object is still there and can be seen from the CLI (version ID ending 59337):
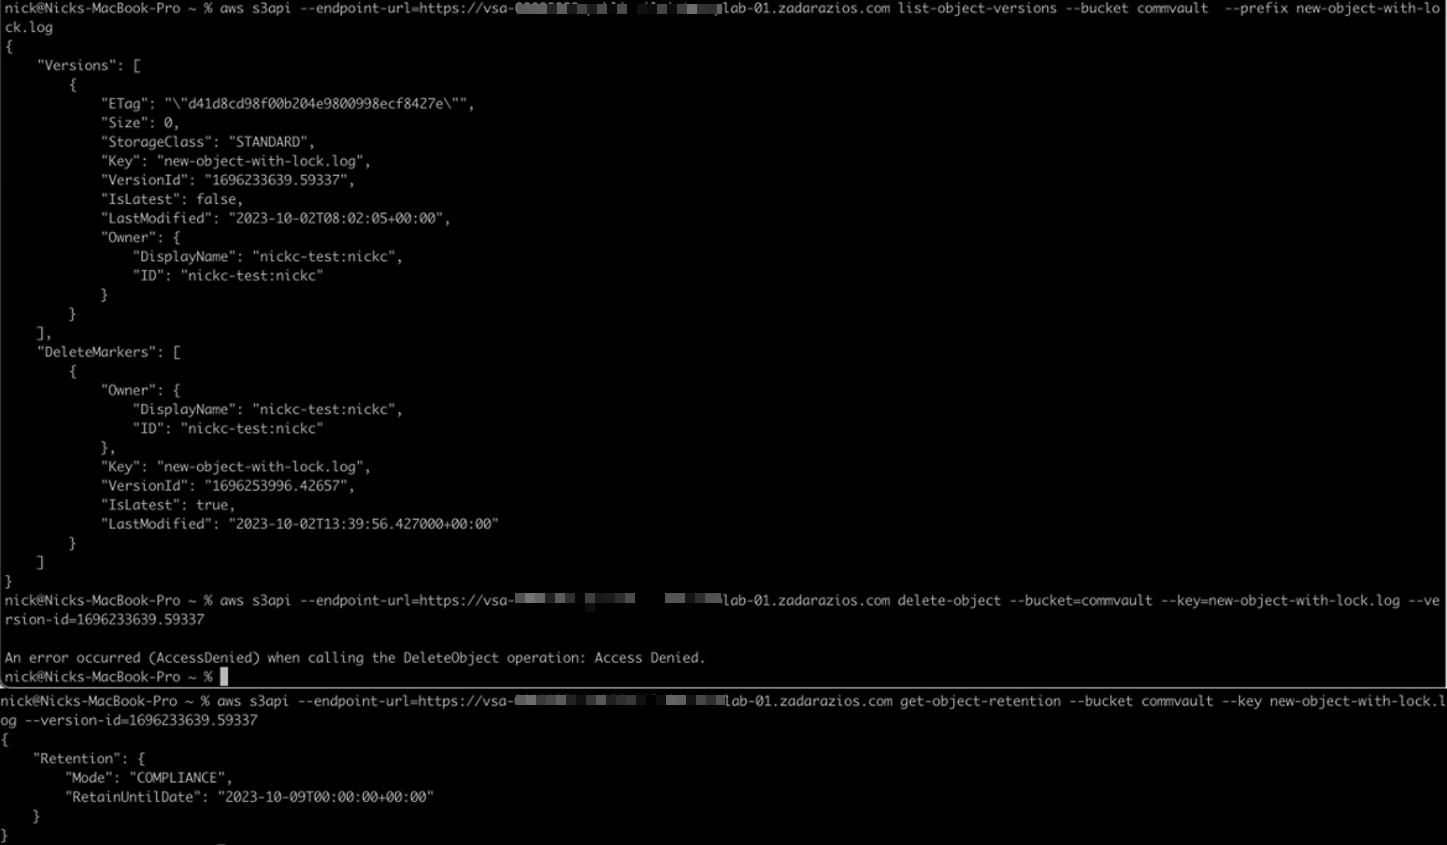
The Object has been masked by a delete marker. The delete marker fools the attacker or software into thinking the deletion has been successful.
In this current state, HYCU would not be able to restore the Object(s) as it too will not see them anymore.
To “recover” the hidden Objects the delete markers need to be deleted.
The required information can be found on AWS here.
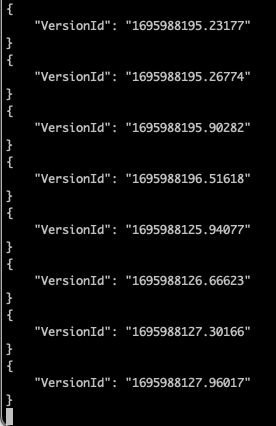
To check for the existence of delete markers use the following command to list a selection of specific objects to identify that “DeleteMarkers” exists and is the latest version of the object:
aws s3api –endpoint-url=<URL> list-object-versions –bucket <bucket-name> –prefix “<Folder>/<sub-folder>/<object_name>”
For example:

Once the existence of delete markers has been confirmed, the following script will list and then delete all of the delete markers in the specified location (i.e. could be a top-level, all-encompassing folder):
aws s3api –endpoint-url=<URL> list-object-versions –bucket <bucket-name> –prefix “<Folder>/<sub-folder>/“ –output json –query ‘DeleteMarkers[?IsLatest==`true`].[Key, VersionId]’ | jq -r ‘.[] | “–key ‘\”” + .[0] + “‘\” –version-id ” + .[1]’ | xargs -L1 aws s3api –endpoint-url=<URL> delete-object –bucket <bucket-name>
(Note: this requires “jq” to be installed)
While the above script is running, the expected output looks like this:
Conclusion
By integrating HYCU with Zadara Object Storage, you can create a robust, scalable, and immutable backup solution that protects your data against threats like ransomware and malicious or accidental deletion. This combination not only ensures data security but also helps meet regulatory compliance requirements.
Investing in immutable backups is an essential step in modern data protection strategies. Follow this guide, and you’ll be well-equipped to safeguard your organisation’s critical data