Welcome to the third in our new blog series on Kubernetes! In this series, we explore the world of Kubernetes deployment on Zadara, and how it can be used to manage containerized applications in our AWS-compatible cloud. Whether you’re new to Kubernetes or an experienced user, this series will provide you with valuable insights and best practices for managing your containerized applications in the Zadara cloud. Stay tuned for more exciting content!
This blog post will focus on running an actual workload on top of our Kubernetes cluster. Deploying WordPress (a well-known blogging & content management platform) will enable us to showcase the power of Kubernetes on the Zadara cloud, spanning over native Kubernetes abilities as well as seamless cloud integrations through our EKS-D built-in add-ons.
WordPress deployment
For this demonstration, we will be using the Bitnami Helm chart for WordPress. Bitnami charts are known to be well-documented, enterprise-ready production-grade deployment solutions, and the WordPress chart is a perfect example for such use-case. In addition to WordPress itself, the chart contains an integrated database (MariaDB), cache store (Memcached) and other Bitnami features such as load-balancing and scaling-oriented options which we will use as part of this demonstration.
Consider the below diagram as a simplified representation of the chart’s default content, omitting resources like ServiceAccount, Secrets, etc. which do not concern cloud integration:
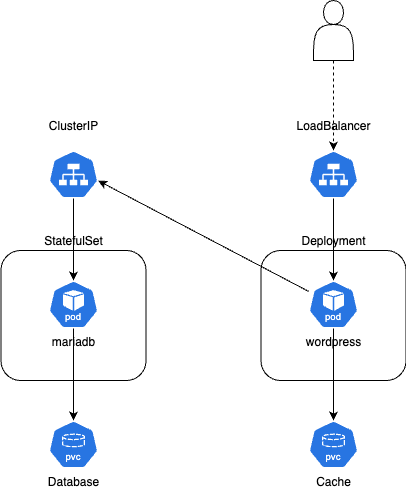
Note that WordPress itself is a Kubernetes Deployment (linked to the memcached PVC) while MariaDB is a Kubernetes StatefulSet (linked to the database PVC). Both are using Kubernetes Services for communication, but MariaDB uses an internal ClusterIP (to be consumed by WordPress) whereas WordPress itself uses a LoadBalancer (to be consumed by an external user).
We will begin by deploying the Helm chart as-is, with no modified values – just to see all the resources being created. Assuming kubectl is configured to work with our Kubernetes cluster (via KUBECONFIG environment variable or any other method), Helm will do the same as we invoke it:
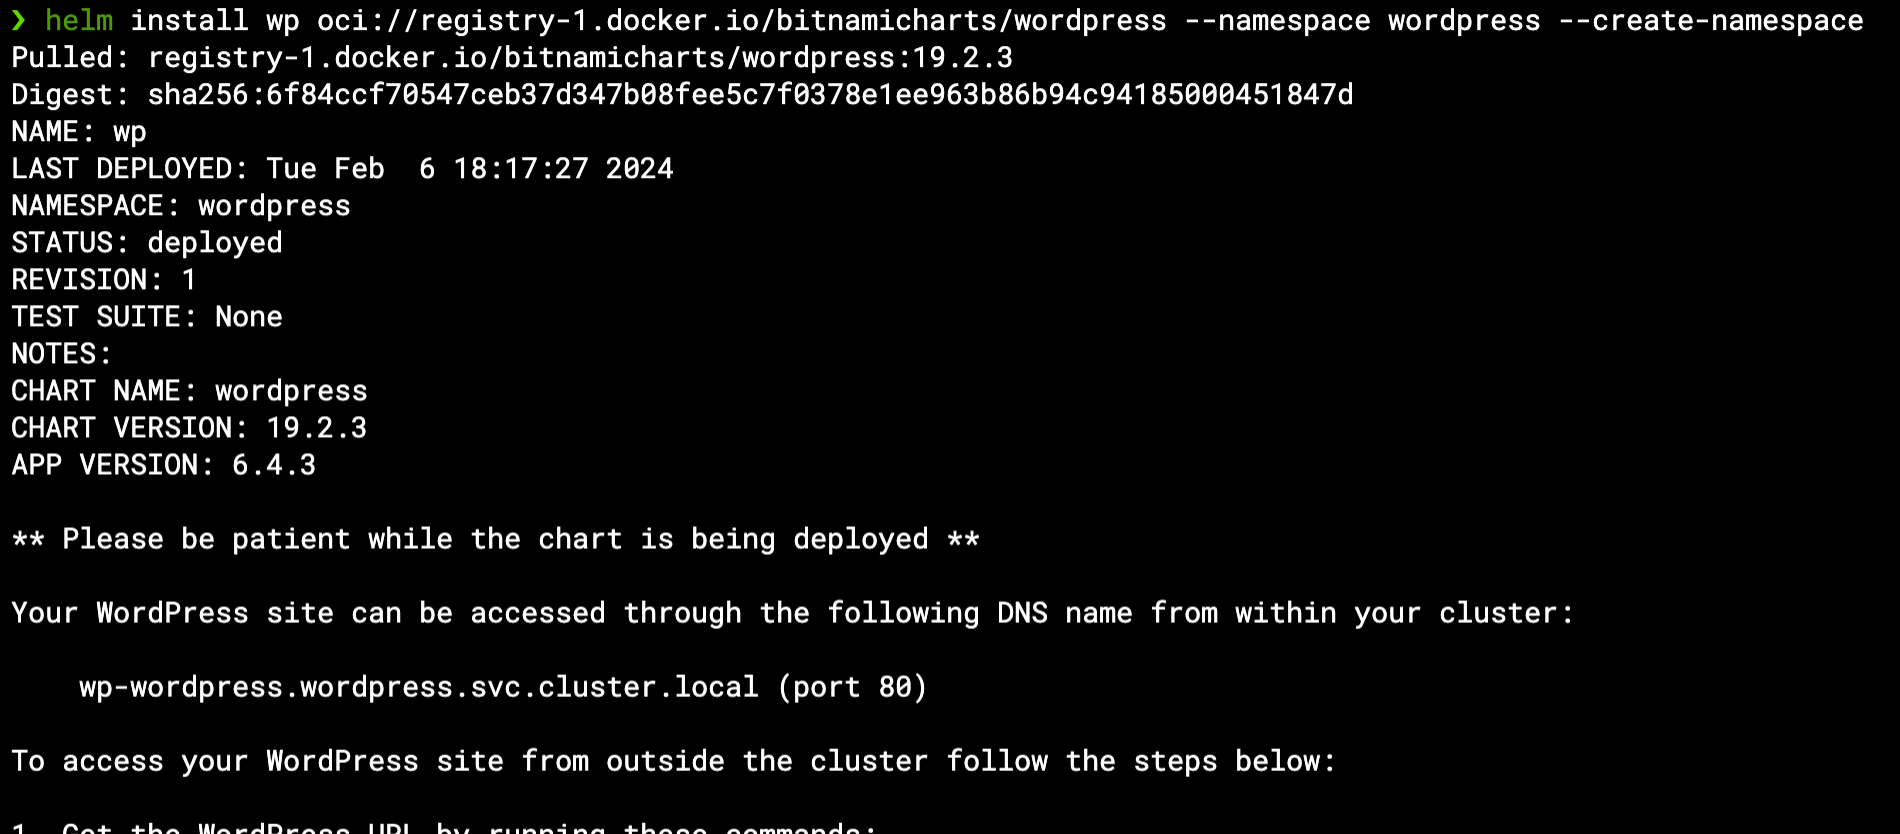
helm install wp oci://registry-1.docker.io/bitnamicharts/wordpress --namespace wordpress --create-namespace
This will install the WordPress chart with all default values as a Helm Release named “wp” within the wordpress namespace (which will be created if not already existing):
We can see several resources being created by the chart inside the wordpress namespace – below we can see the pods, PVCs & services mentioned in the aforementioned architectural diagram:

Note the pods were scheduled to run on k8s-worker-1 but they are still not ready – we can give them few more seconds as we watch them getting ready:

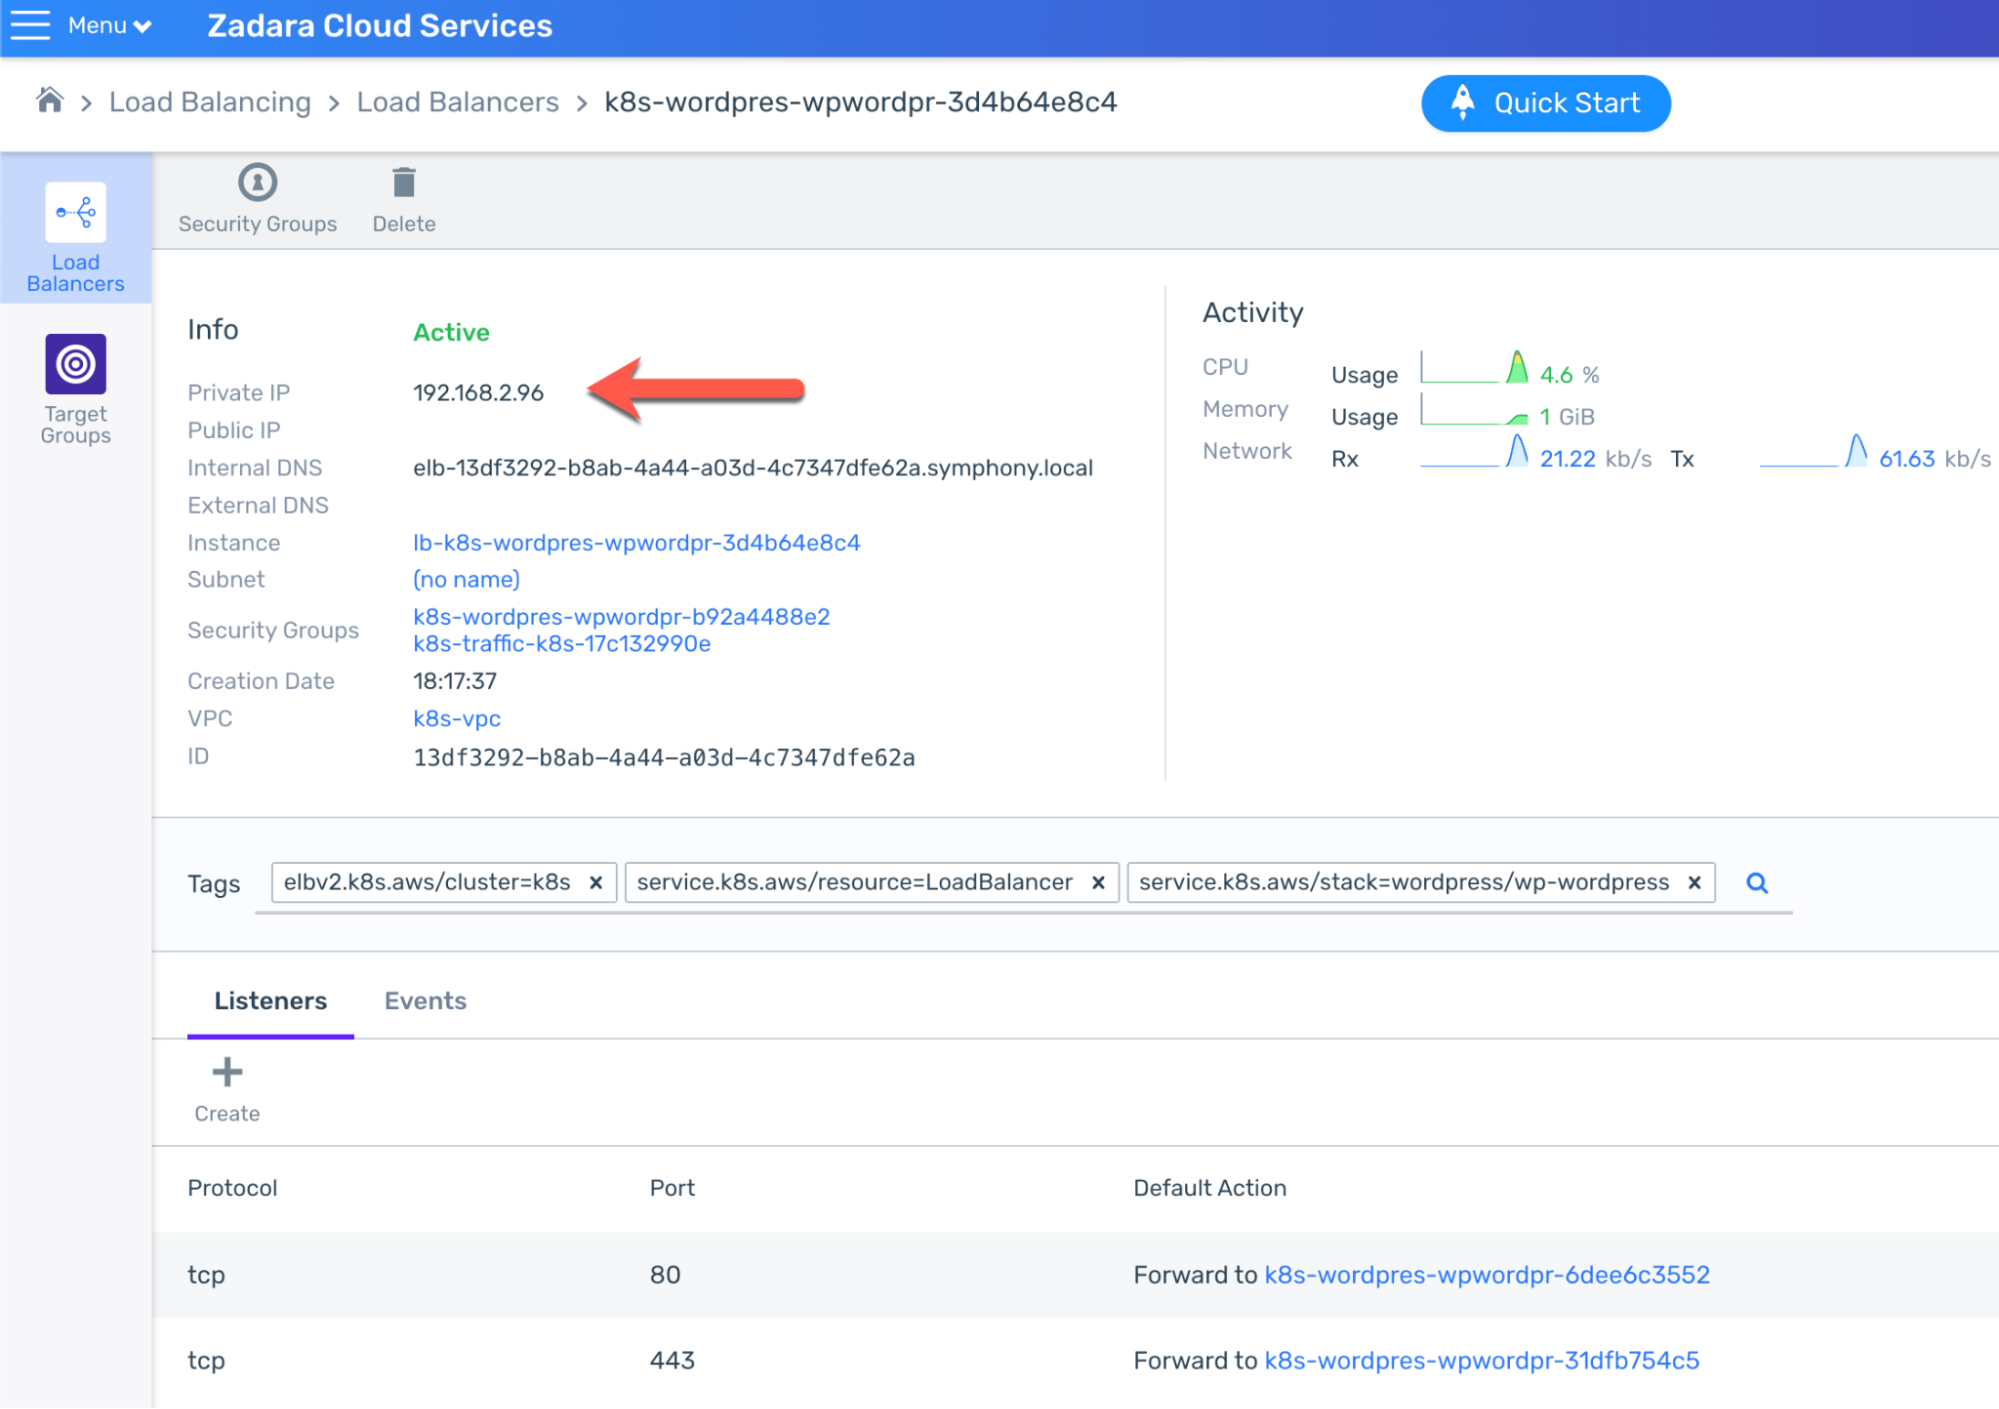
Now that the pods are ready, we should be able to access WordPress. Normally we would do so through the LoadBalancer Service which was indeed created as we’ve just seen, but there’s a caveat – by default and unless specified otherwise, the AWS Load Balancer Controller (in charge of translating Kubernetes resources into cloud-level Load Balancers) will create an internal-facing Load Balancer rather than a public-facing one. This is actually an AWS API limitation by design that Zadara’s compatible API replicates, so the Load Balancer only has an internal IP & DNS:
While this Load Balancer can’t be used outside the VPC, we can see the Target Groups, forwarding relevant port requests to the relevant worker node ports – for example on port 80:

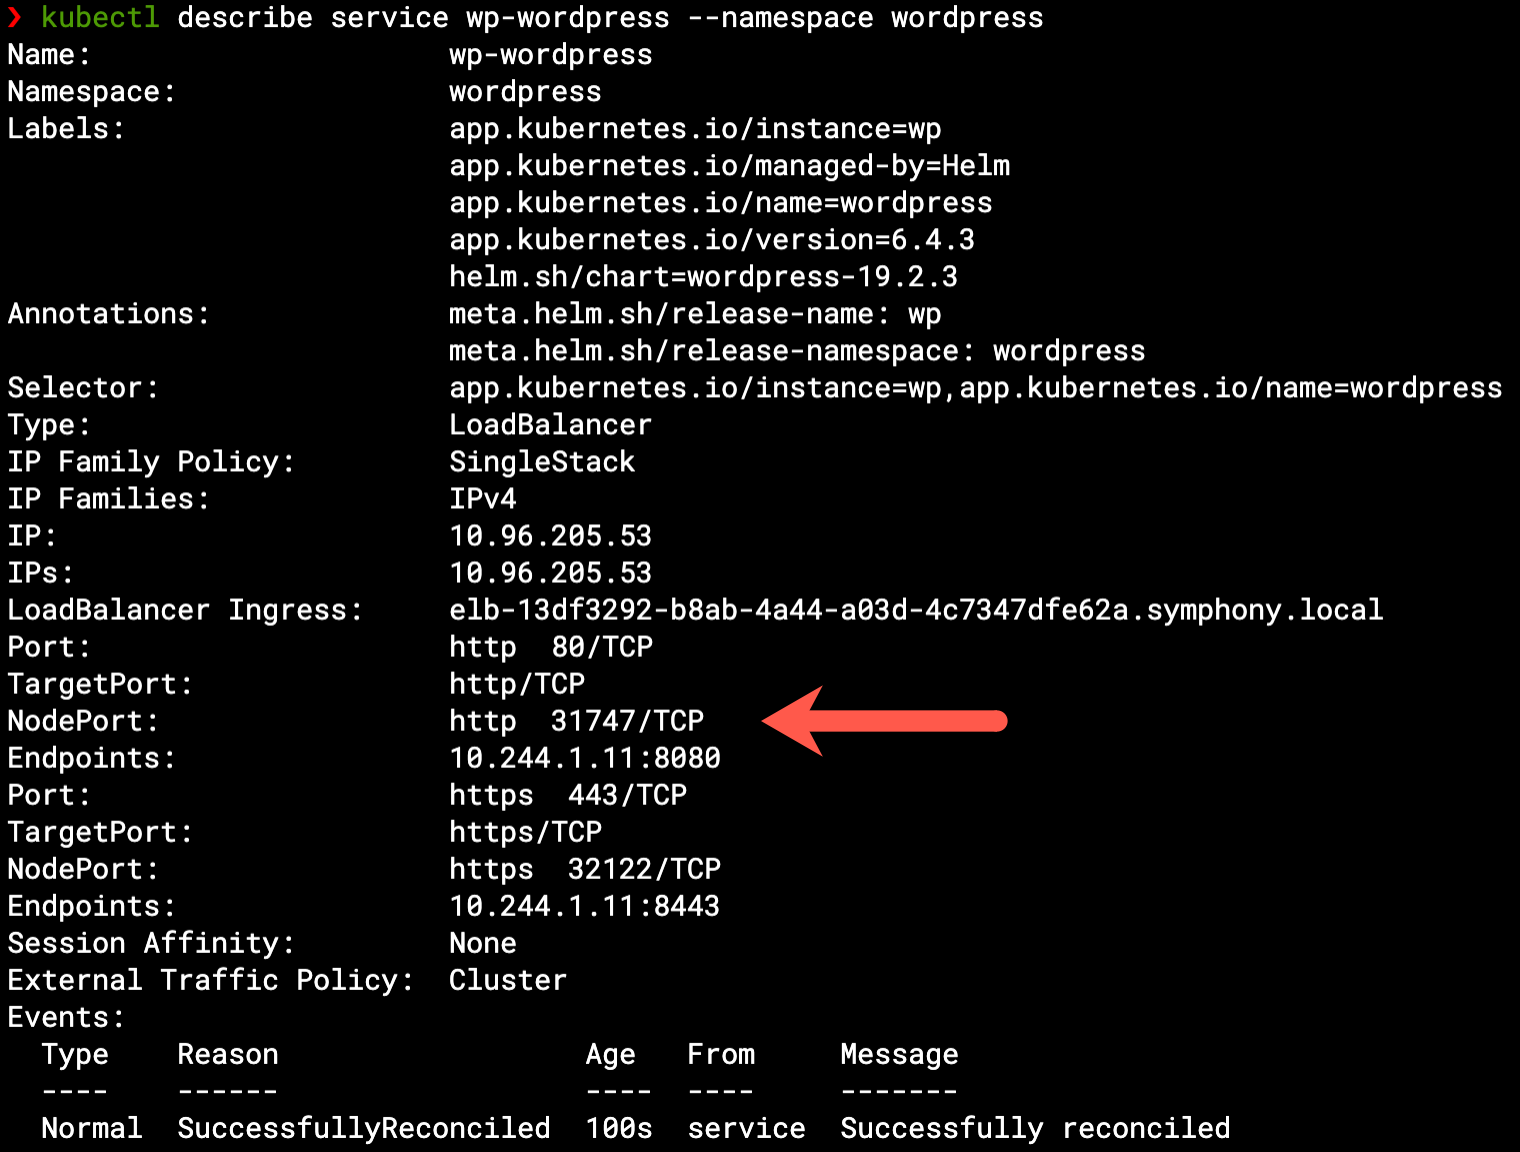
The same information can be seen from the Kubernetes side if we describe the Service, as it manages these ports on each worker node – listening to incoming communication and forwarding it to the relevant pod IP (endpoint):
At this phase, while WordPress is running inside our Kubernetes cluster, the only way to use its Load Balancer is via another VM inside the VPC, like our bastion VM. We could also do some port-forwarding (through the bastion VM or directly on the Kubernetes pod) in order to consume WordPress from our local browser, but that’s not a real way to consume the application – we need an internet-facing Load Balancer rather than an internal-facing one.
Load-Balancing (revisited)
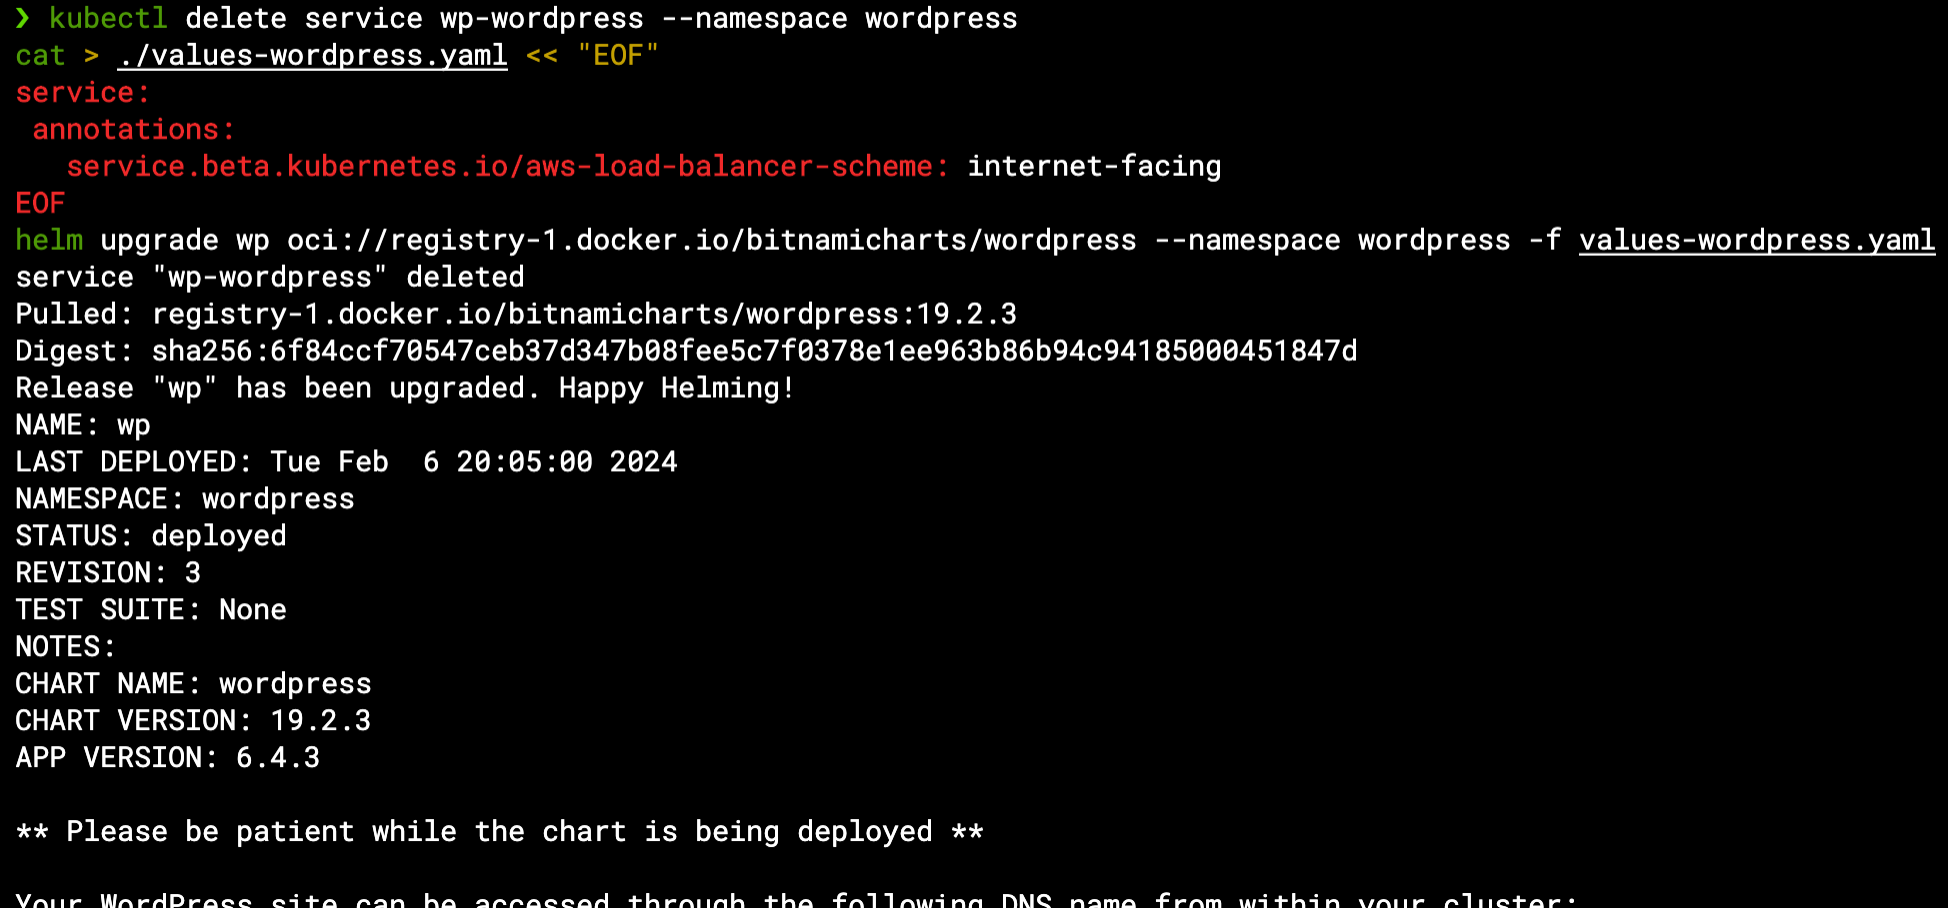
We’ve seen how a Kubernetes Service translates into a cloud NLB (Network Load Balancer), however, neither Kubernetes nor AWS/Zadara allows modifying an existing Service/NLB. Alternatively we will delete the existing Service (which will also delete the NLB) and update our Helm release with the relevant configuration (using a dedicated values file) to create a public-facing Load Balancer:
kubectl delete service wp-wordpress --namespace wordpress
cat > ./values-wordpress.yaml << "EOF"
service:
annotations:
  service.beta.kubernetes.io/aws-load-balancer-scheme: internet-facing
EOF
helm upgrade wp oci://registry-1.docker.io/bitnamicharts/wordpress --namespace wordpress -f values-wordpress.yaml
Here we created the values file based on the chart’s original values properties as mentioned in the chart documentation, and used the internet-facing value for the scheme annotation per the Load Balancer Controller’s Service documentation so the new NLB will be accessible from the world:
Within minutes the new Load Balancer should be ready for usage – the Service annotation is used to control its behavior so this time it will have a public IP address to be used in order to access it from the broader internet:
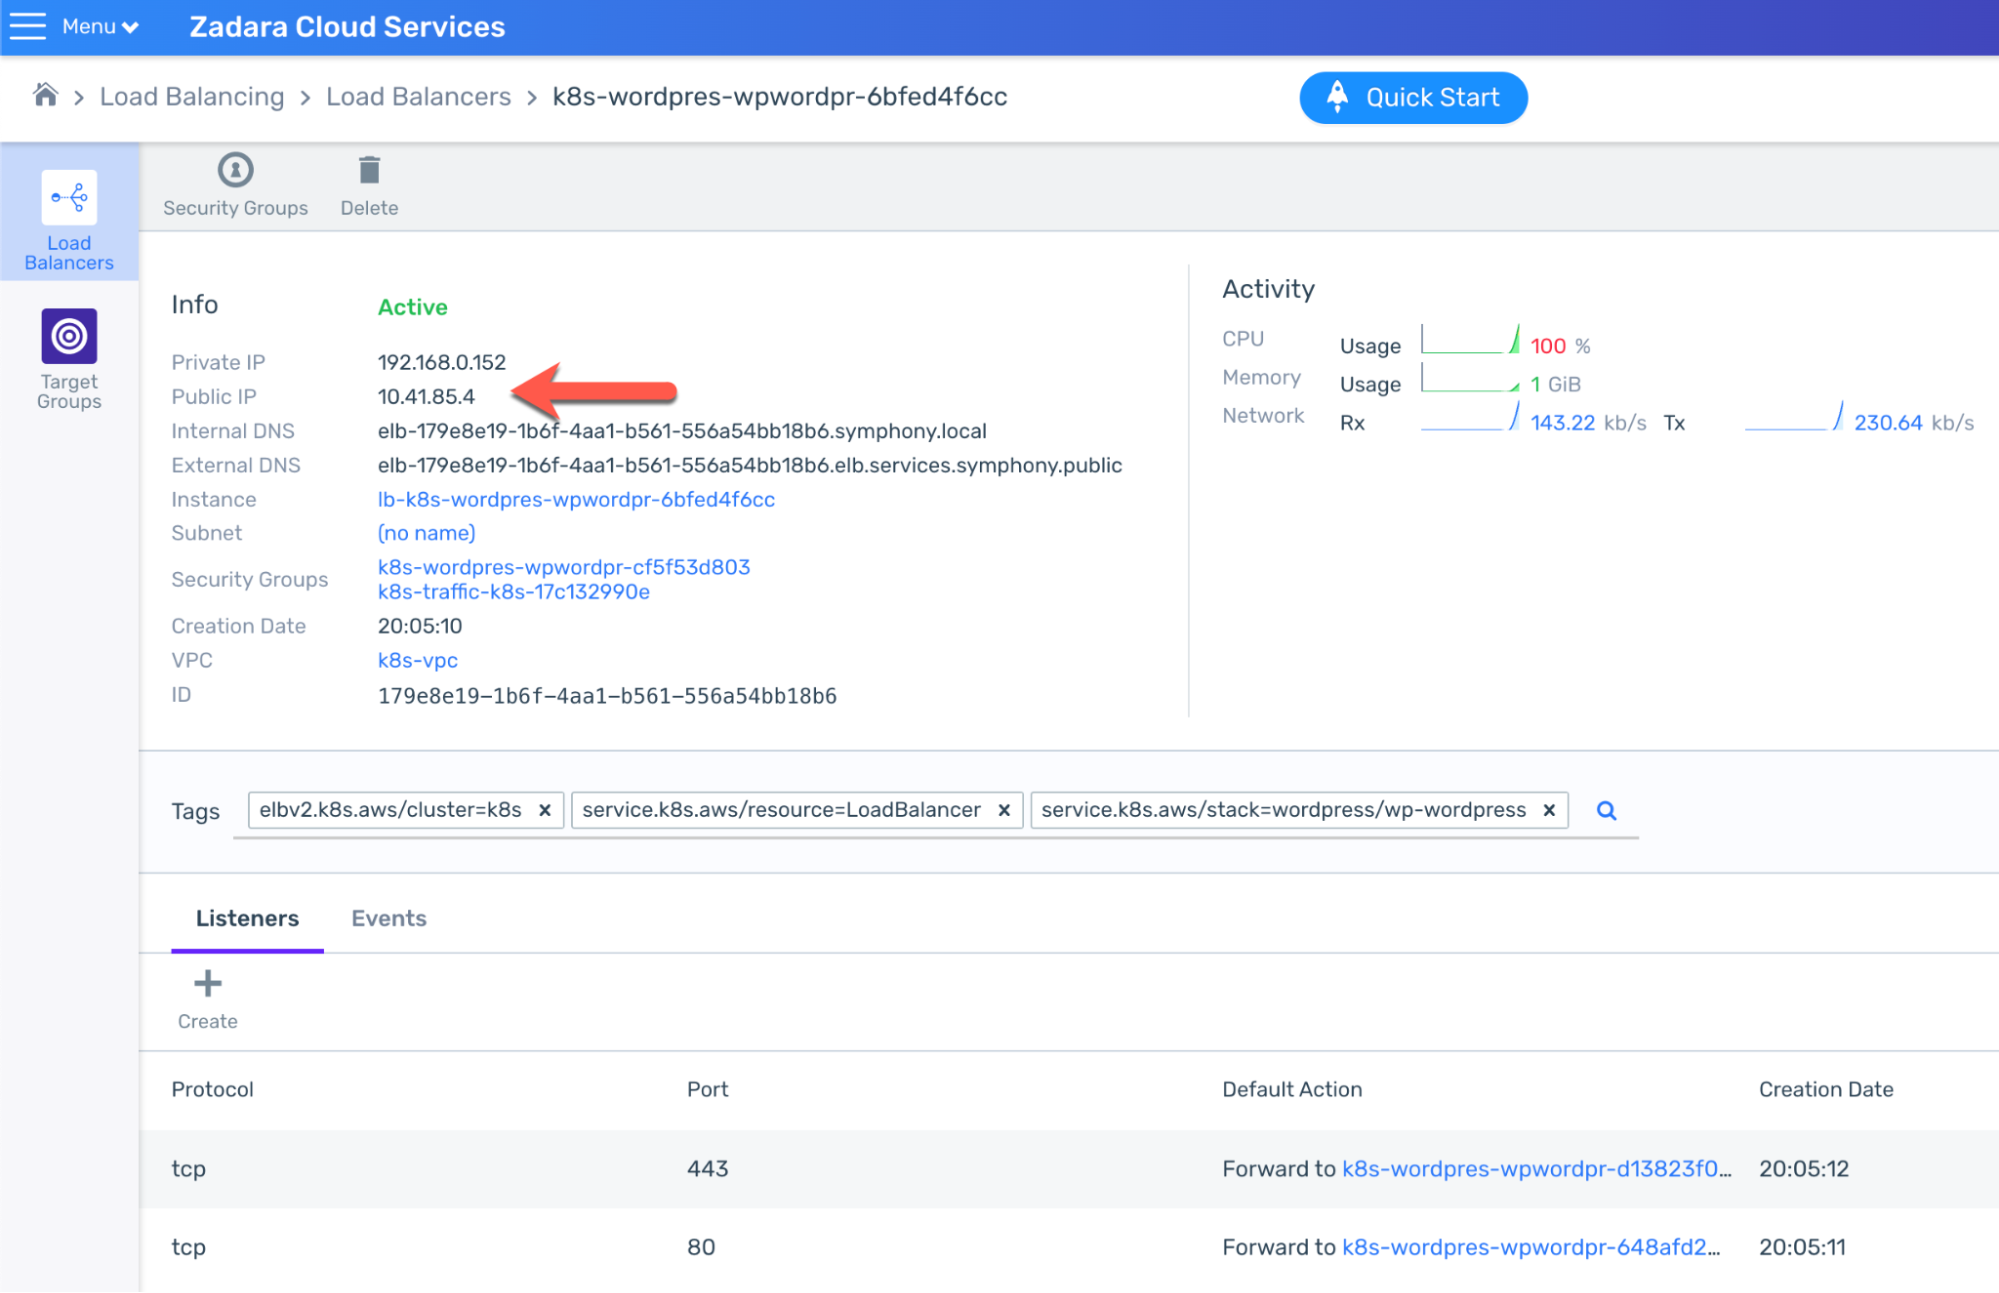
Please note we can’t use the external DNS name, because unlike AWS the Zadara cloud does not offer public DNS services – but you may use your own DNS provider to create an A record for this public IP, or use it directly in order to access the application from the internet:
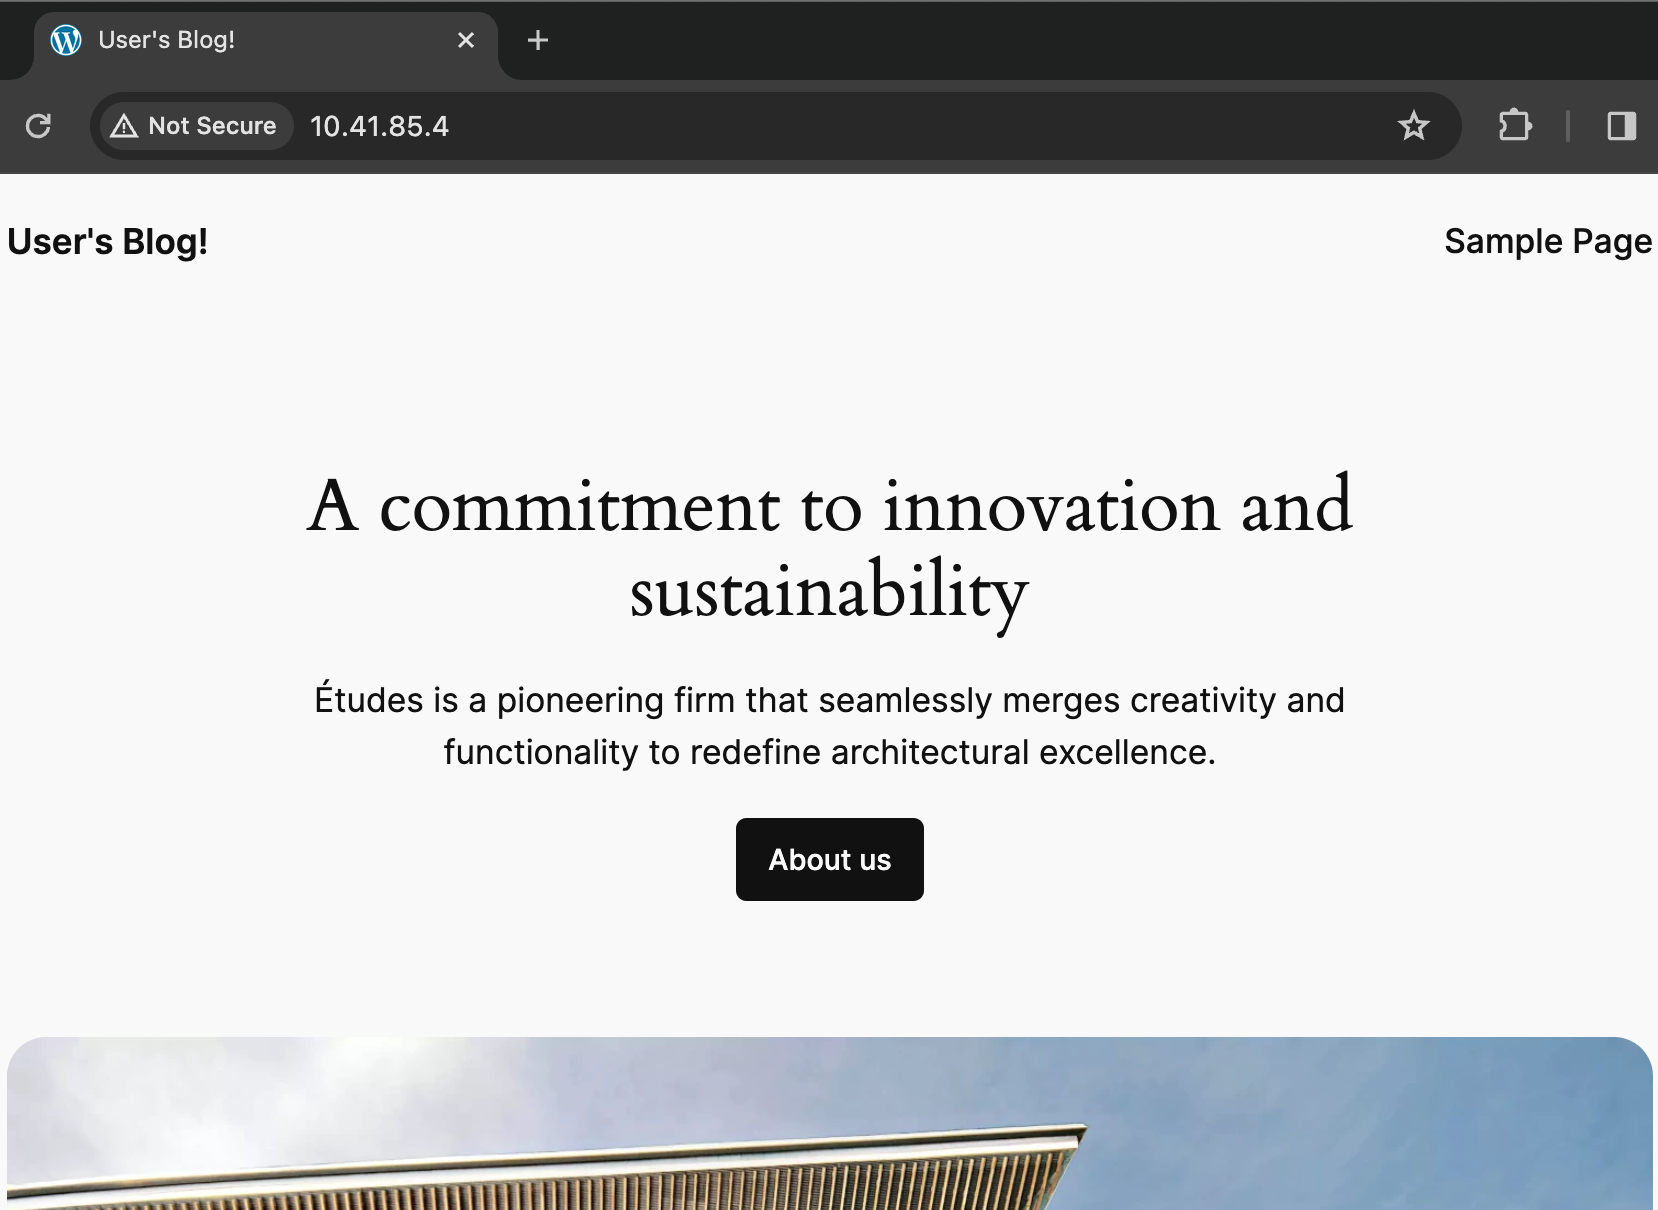
You might have noticed we did not use a secured connection for browsing in this example because we used the direct IP and Zadara’s NLB doesn’t currently support domain certificates. However this would be a perfect excuse to introduce ALB (the layer-7 Load Balancer) which will interact with Kubernetes through an Ingress resource rather than a Service. Such Load Balancer support domain certificates so we can import one into the cloud and later use it as we define the Ingress resource:
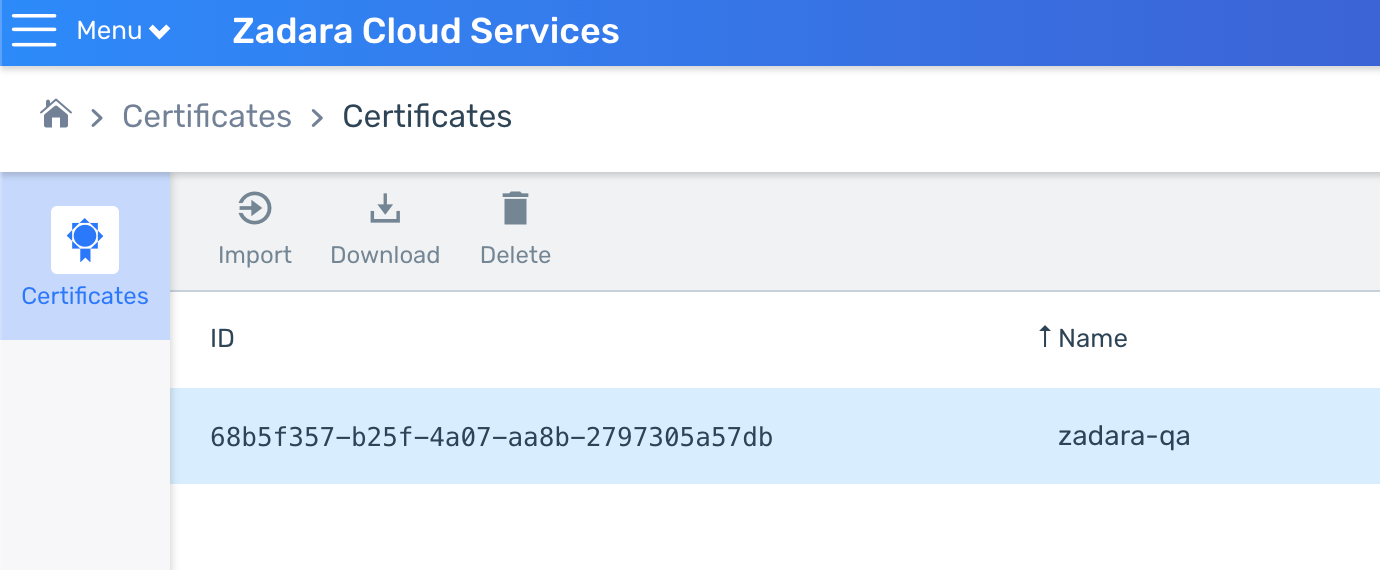
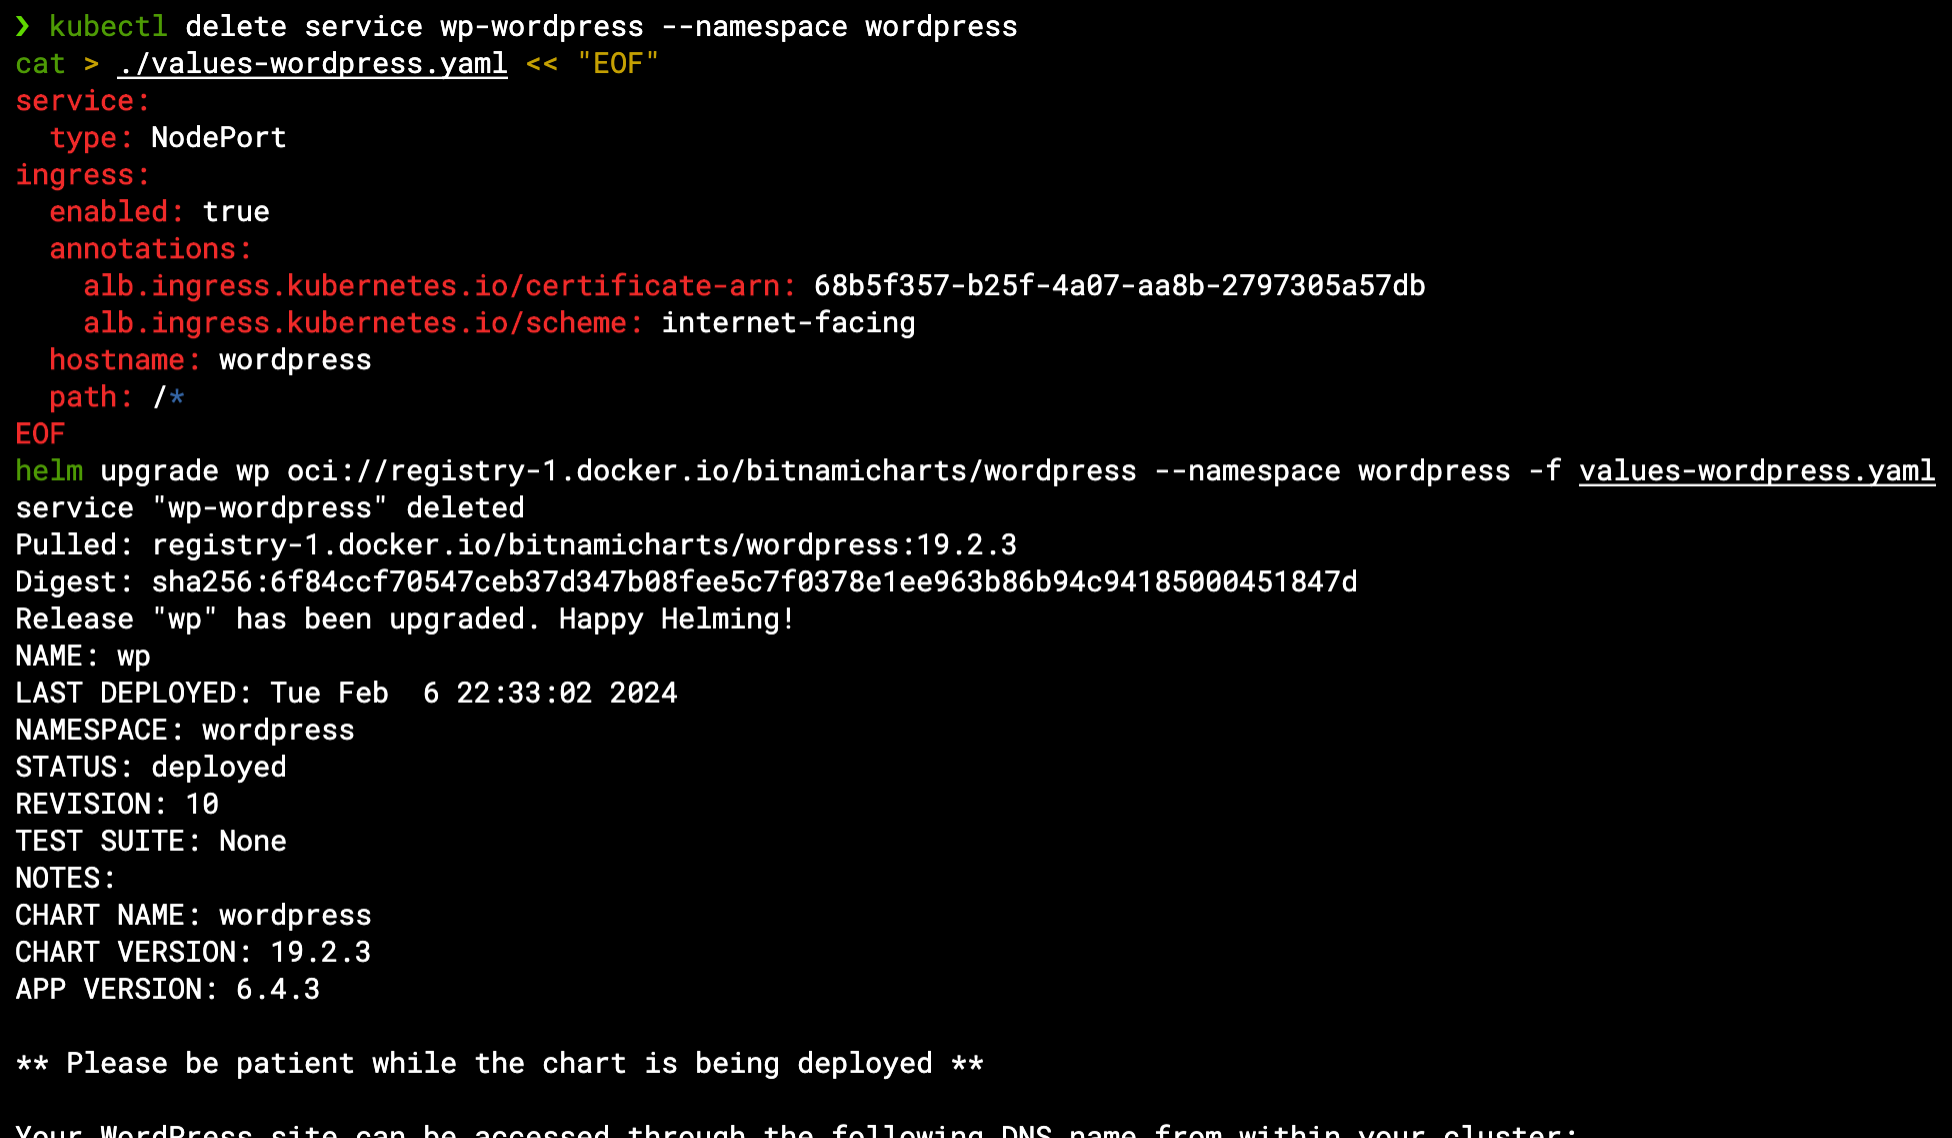
We can now delete the current Load Balancer Service and re-configure the Helm values file based on the chart’s documentation as well as the Load Balancer controller’s Ingress documentation to create an internet-facing Ingress resource that will use this certificate id:
kubectl delete service wp-wordpress --namespace wordpress
cat > ./values-wordpress.yaml << "EOF"
service:
type: NodePort
ingress:
enabled: true
annotations:
alb.ingress.kubernetes.io/certificate-arn: 68b5f357-b25f-4a07-aa8b-2797305a57db
alb.ingress.kubernetes.io/scheme: internet-facing
hostname: wordpress
path: /*
EOF
helm upgrade wp oci://registry-1.docker.io/bitnamicharts/wordpress --namespace wordpress -f values-wordpress.yaml
Note that an Ingress still requires a Service to route the traffic through its port/s – we could just leave the LoadBalancer Service as it was, but instead we switched it to a NodePort Service (a node-level port configuration rather than a cloud Load Balancer) which will do the trick just the same without consuming cloud resources:
This time the Load Balancer will be an internet-facing ALB, listening with an HTTPS protocol:

The ALB is pre-defined with listener rules to accommodate the certificate and the other configurations defined in the chart (for example the hostname must be “wordpress” in order to reach the application):
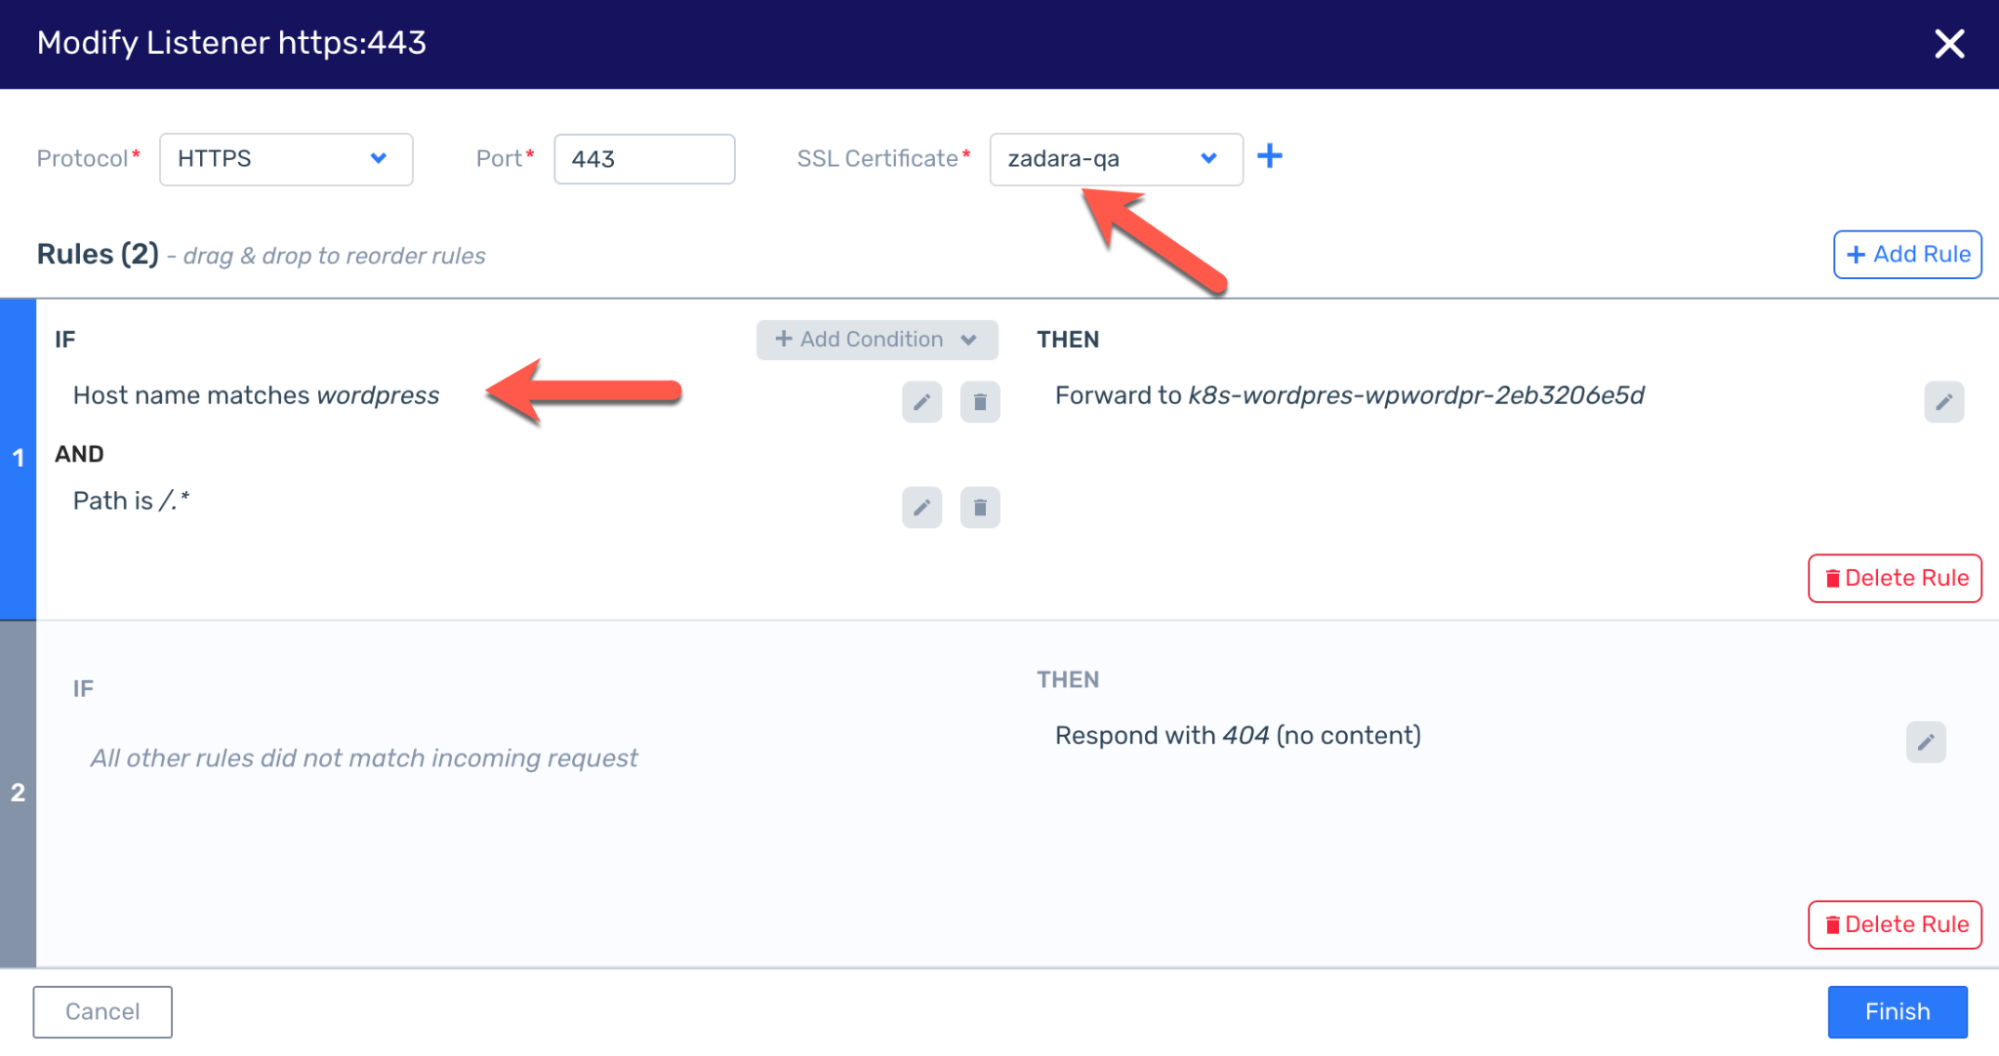
That is also why we can’t just use the public IP as-is and enjoy a secured connection – the certificate is only valid when used with the right domain name, and the ALB will not allow a hostname other than “wordpress”. In order to complete the secured solution we need to create an A record for this public IP within our DNS provider – once set we can browse to https://wordpress.zadara-qa.com and observe our connection is now secured:

Scaling Kubernetes
Kubernetes offers various ways to dynamically scale your environment to accommodate changing needs (for example, making sure your application is responsive during peak load time, etc.), here we will only focus on demonstrating methods which utilize cloud integration – namely to scale up/down the data-plane (workers ASG) nodes to fit our needs. Other methodologies (such as horizontal/vertical pod scaling, or pod anti-affinity rules) are internal to the Kubernetes cluster so we will not cover them during this demonstration.
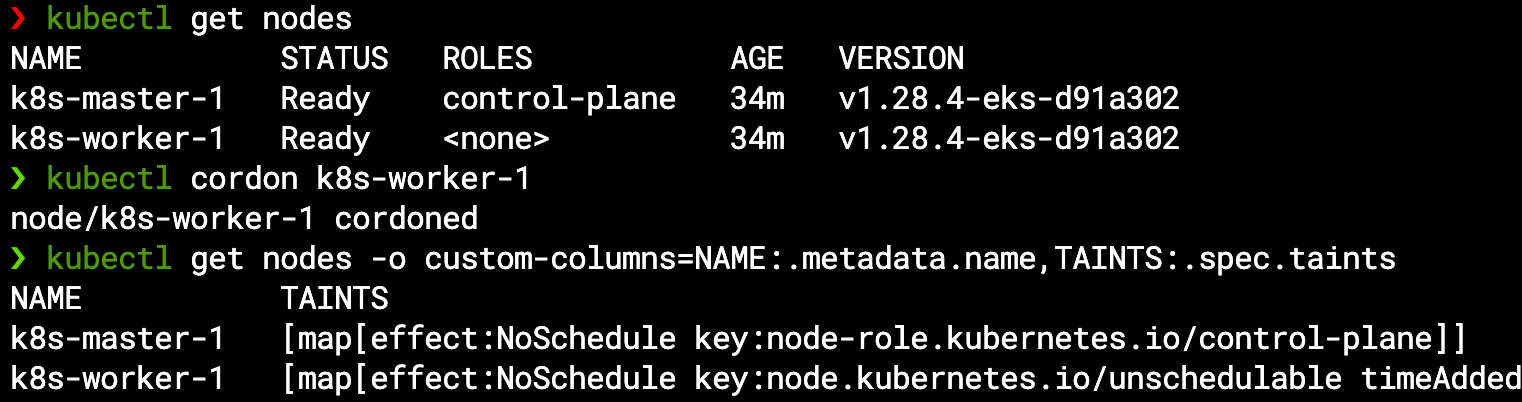
One way of forcing our cluster to scale would be to freeze (cordon) our current worker node from accepting new pods, and then try to create such new pods – for example we will ask to scale up our MariaDB StatefulSet from a single-pod setup to multi-pods by setting the replica count to 2:
kubectl cordon k8s-worker-1
kubectl get nodes -o custom-columns=NAME:.metadata.name,TAINTS:.spec.taints
kubectl scale --replicas=2 statefulset/wp-mariadb --namespace wordpress
kubectl get pods,pvcs --namespace wordpress
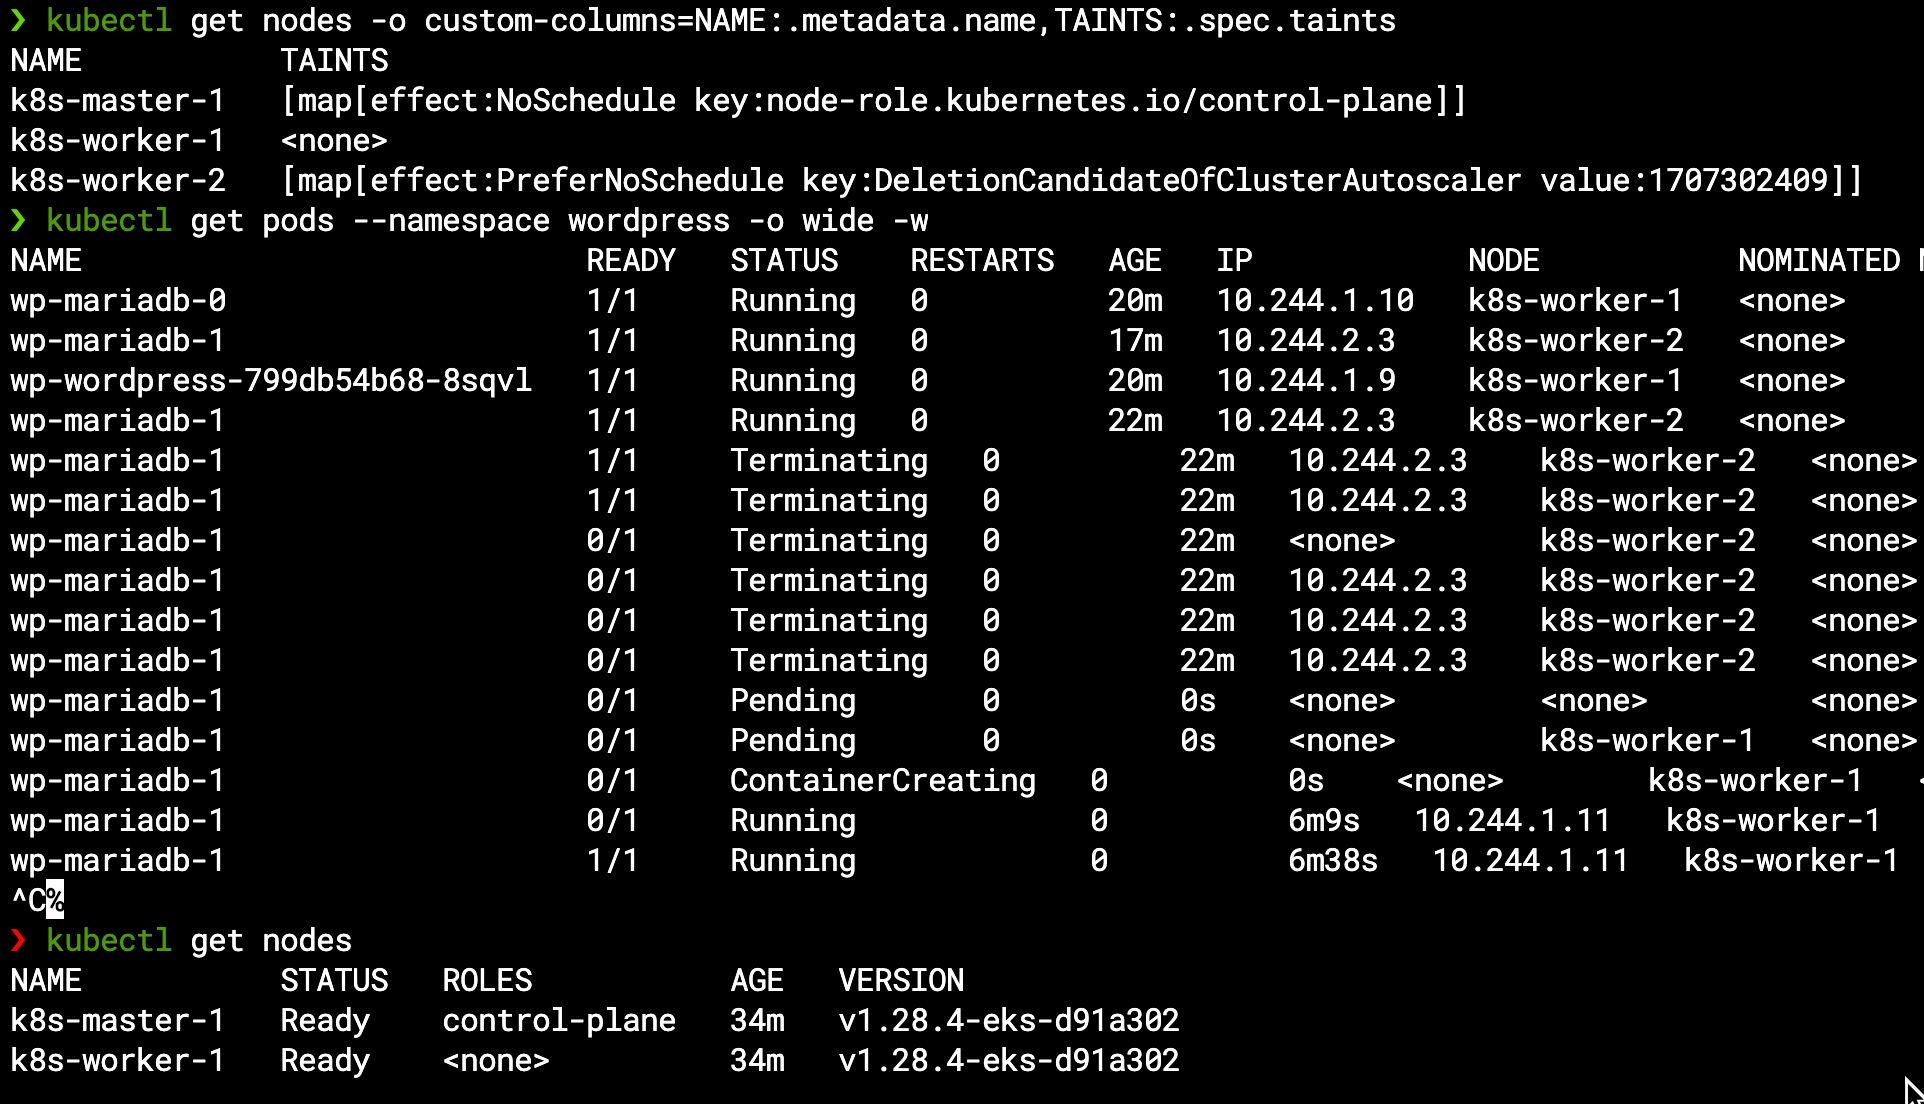
We can see the worker node now has a NoSchedule taint (similar to the master node but from different reason):
We can see the new pod in a pending state as it awaits an available node to run on, and similarly the new PVC is pending the pod (as the EBS CSI will hold off the volume attachment to the relevant instance):

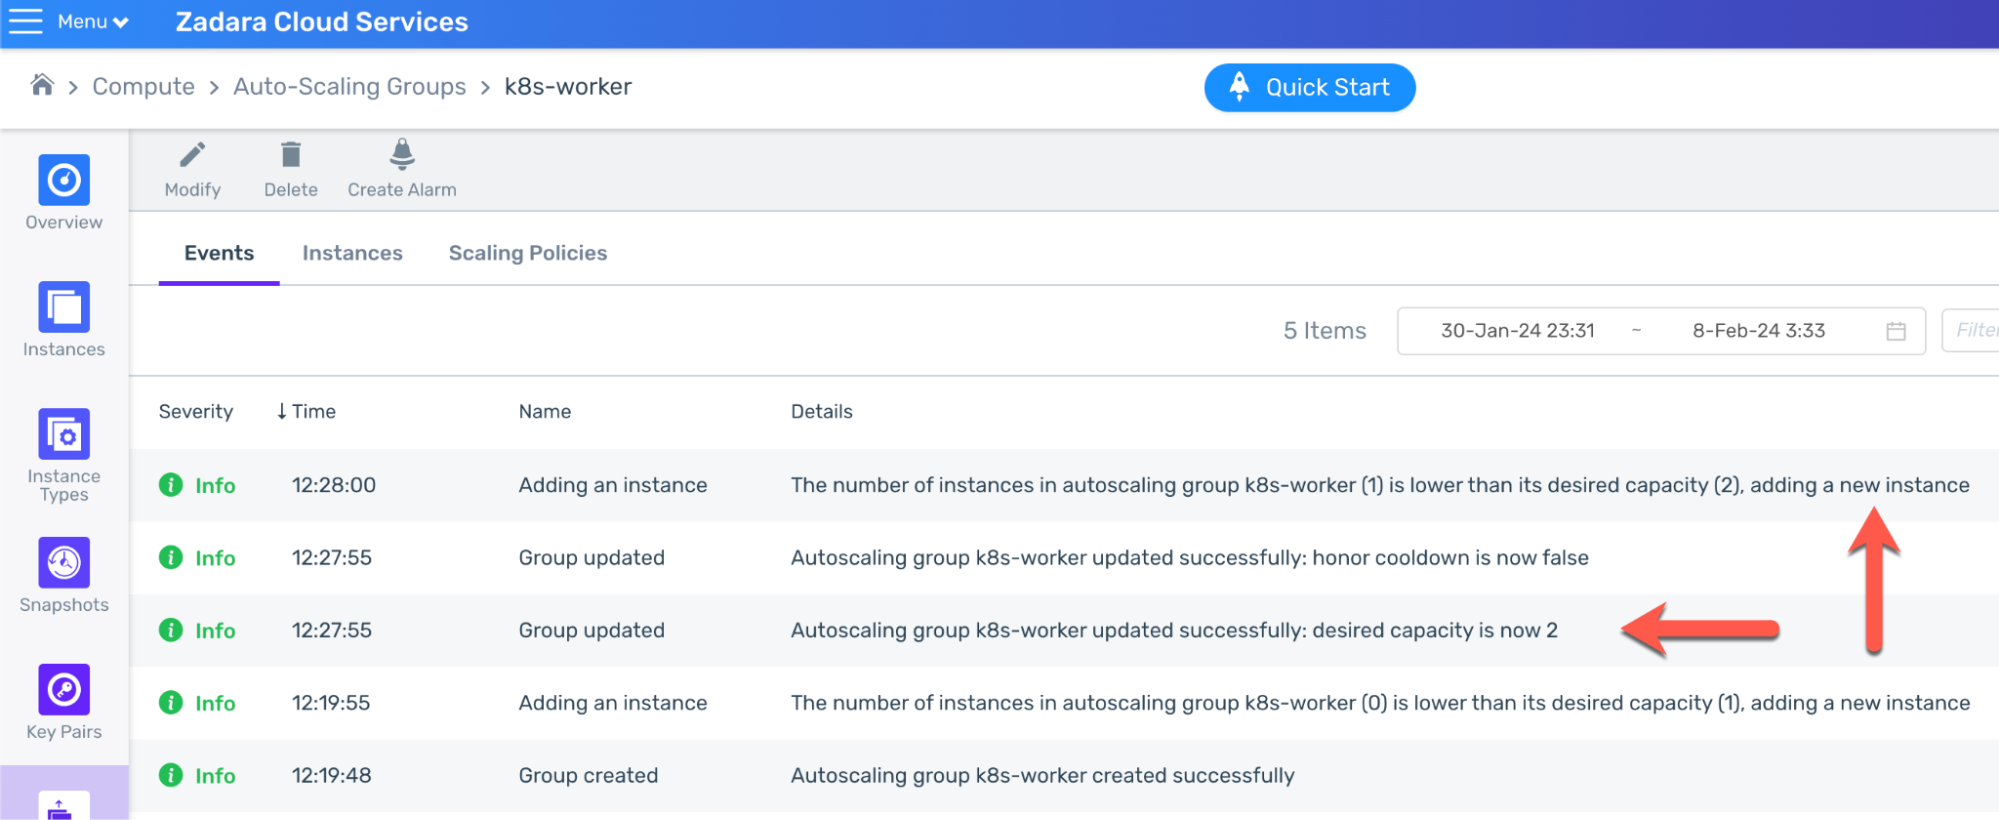
As our EKS-D solution comes pre-packed with the cluster-autoscaler add-on, it listens to any pending pod not being scheduled on an available node – and change the workers ASG desired capacity accordingly between the preset minimal & maximal values:

The ASG picks up the signal and updates the ASG desired capacity, thus creating a new worker instance:
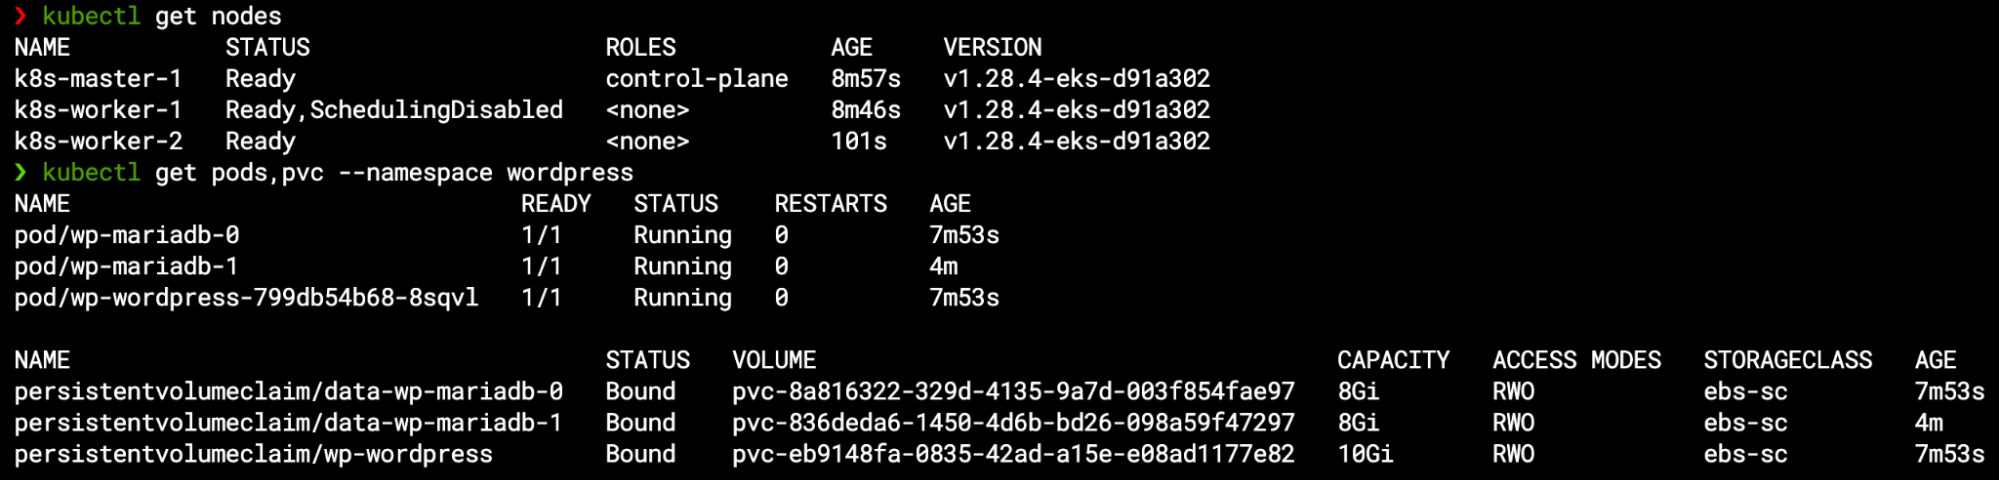
Within few minutes, the new worker node joins the Kubernetes cluster and becomes ready – by then, the pod finally gets scheduled to the available node, and so the new PVC is bounded to the new volume attached to this node:
If you wonder about scaling down, we can always uncordon the first worker and wait for 10 minutes (the default cluster-autoscaler inactivity window before scaling-down). The extra node will get a PreferNoSchedule taint (as it is a candidate for deletion) and at the scale-down window deadline the second MariaDB pod will be automatically moved to the first worker node (including its PVC and underline Volume) so the node can be safely deleted:
Few words about persistence
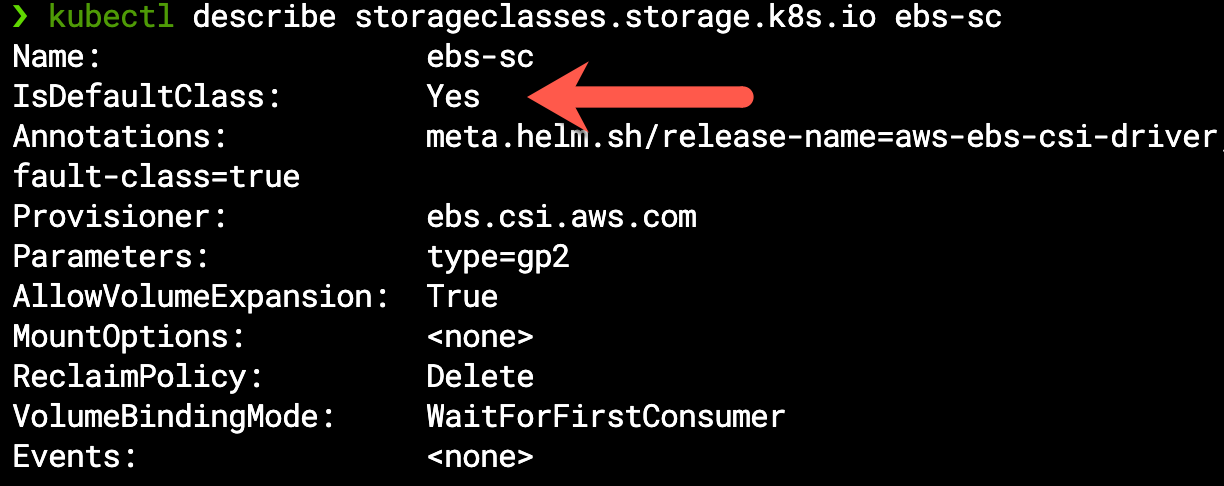
Throughout this demonstration we took for granted the fact that this application requires storage, the reason being our out-of-the-box default EBS CSI configuration makes it the implicit StorageClass for all persistence requirements unless stated otherwise:
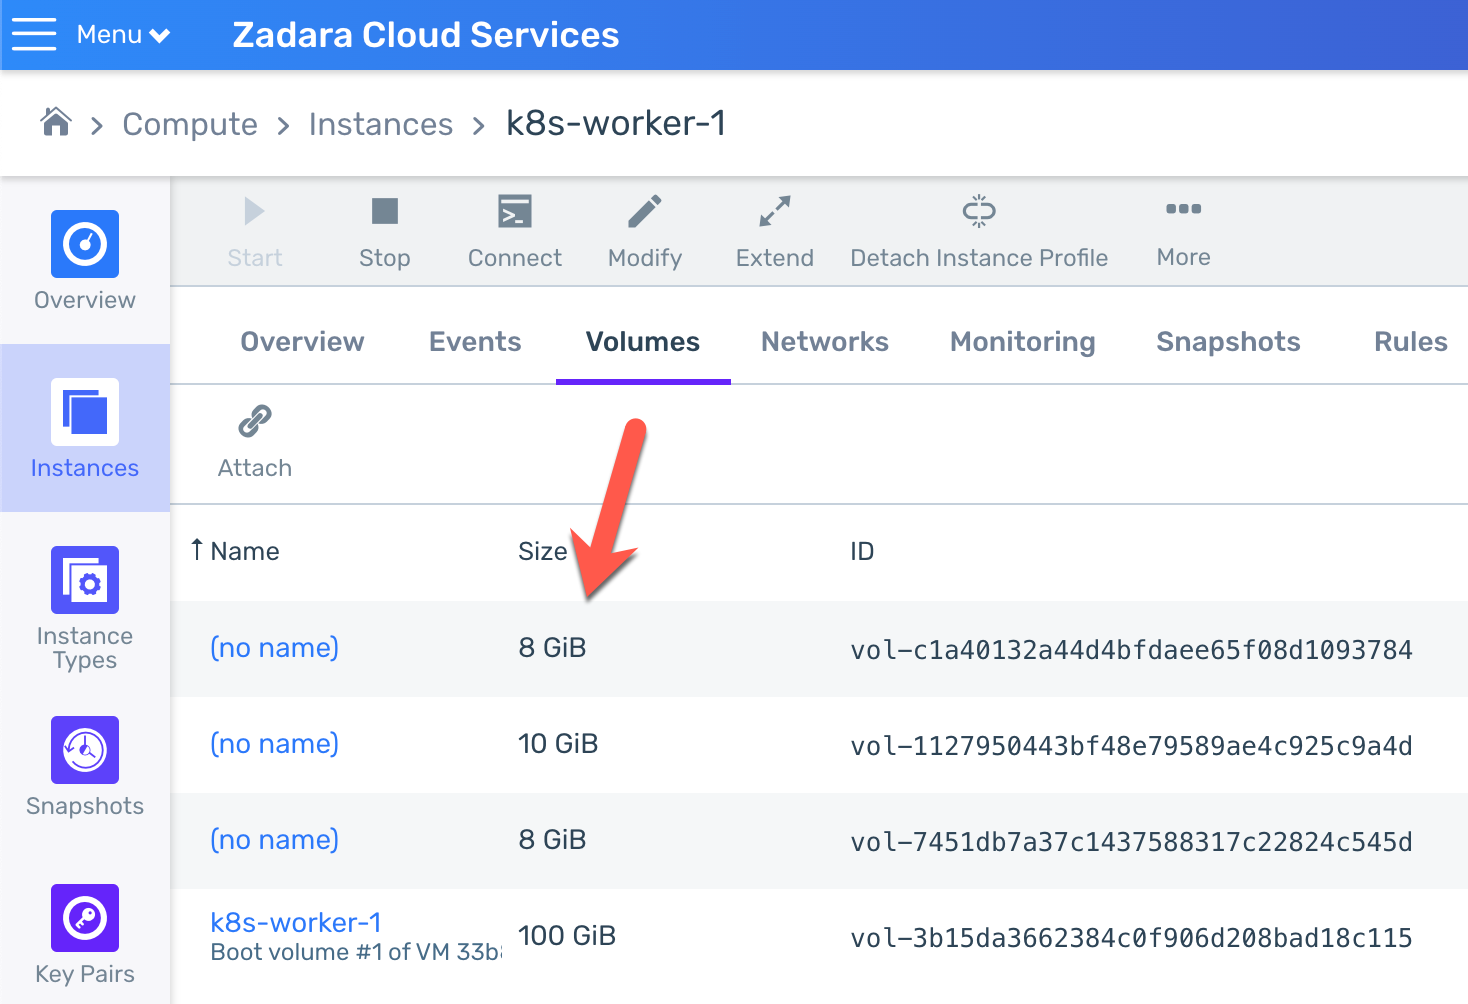
In fact, all of the PVCs which were created as part of the Helm chart are bounded to their corresponding volumes (which are attached to the same worker node that also holds the application pods):
One last feature of the EBS CSI which is also enabled by default is the ability to expand an existing PVC requested capacity size – we can change it by updating our Helm Release, or by manually patching any existing PVC directly, either way the underline PV will be expanded shortly after our request and the PVC size will reflect the new size:

And just like that, our wordpress volume was expanded from 10GB to 12GB. Please note that by design you can only expand existing PVCs (you can’t decrease their size), but otherwise this is another seamless cloud integration you don’t need to worry about – the EKS-D solution handles it for you.
Final thoughts
In this blog post, we’ve deployed WordPress as a typical Kubernetes workload using standard tools and methodologies – Helm handled the deployment itself while our built-in EKS-D add-ons provided seamless integration to handle cloud resources such as Volumes, Load Balancers & Auto-Scaling Groups. Now that our workload is up & running, we will be able to discuss backup & restore use-cases in our next blog post – stay tuned!